All Activity
- Past hour
-
Free Music / SFX Resource - Over 2000 Tracks
Eric Matyas replied to Eric Matyas's topic in General Discussion
Greetings Friends, I have some cool new Sci-Fi tracks to share with you. Free to use, as always, with attribution. They are: Introspective Machine Intelligence_LoFi Ancient Alien Worlds_LoFi Across the Martian Desert_LoFi You can freely download them here: https://soundimage.org/sci-fi-12/ Ogg GAME MUSIC MEGA-PACK Please be sure to check out my mega-pack which enables you to download all of my game music at once in higher-quality Ogg format. Ogg tracks loop better in game engines and they're a great way to support my hard work, too. 🙂 You'll find them here: https://soundimage.org/ogg-game-music-mega-pack/ Have a good week and please stay safe. -
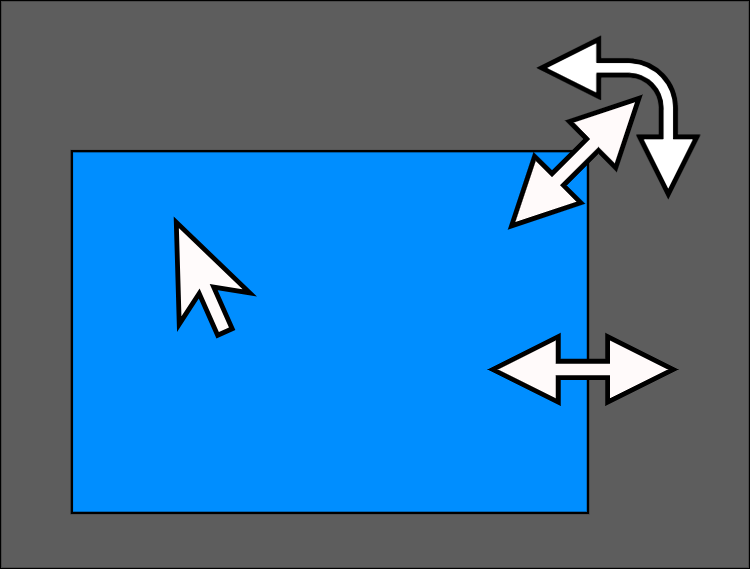
One method that does not require a custom mouse pointer is to mouse click to switch between resize and rotate. Sample from Boxy SVG. Thanks, Tom ClickToSwitchResizeRotate.mp4
- Today
-
That would be brilliant if you could. I also have trouble seeing the Rotate and also the Centre Dot marker on some images. Would be good if that could be made larger also, or maybe an option to change the colour of it if possible. Jill
-
Hi Tom, I agree with you, we'll try to improve these mouse pointers in future V12.
-
Too bad there is not an operating system provided mouse pointer for rotate. I guess it requires a custom pointer and software that reads the system pointer size and adjusts automatically. It's easy to make a custom cursor from a .png file. Maybe there is a file in the WnSoft folder that can be updated. This might be considered a Suggestions for Next Version instead of Troubleshooting. My 68 year old eyes can see the small cursor but I usually increase the size. Thanks, Tom
- Yesterday
-
I asked Grok This behavior occurs because application-specific cursors are often defined by the software itself, not by the Windows system cursor settings. Windows Cursor Scaling Limitations: Windows’ cursor size settings (adjusted via Settings > Accessibility > Mouse pointer and touch or Ease of Access > Cursor & pointer) primarily affect the default system cursors. Custom cursors in apps may not inherit these changes. Kieron
-
I have noticed that when I increase the size of the mouse pointer in Windows that the rotate object size does not increase, On a Mac it increases in size but the rotate pointer resolution is lower than the other pointers. Windows 11 PTE AV Studio 11.0.18 Thanks, Tom MouseCursorRotateSize.mp4
- Last week
-
Hi Tony, Yes, the stabilisation mode automatically decides how much zoom is needed to effectively stabilise a video frame (even if you set the Expand to "0"). However sometimes (rarely) small black bars may appear on the edges in case of strong shaking in a frame. In this case, the Expand option will help to correct a frame. Also if even the "Strong" stabilisation mode doesn't help to stabilise a video frame (or if you want a perfect stabilisation!), the Expand option gives the stabilisation algorithm more screen space for more effective stabilisation. Try values between 5-10 for the Expand option. Consider another mode - Camera Lock, if the movement in the frame is small (shooting handheld, but the operator tries not to move a camera, not to turn a camera). In this case, stabilisation will be ideal, as if you were shooting from a fixed tripod. I've checked many video files from different sources, from different cameras. Normal or Strong modes do a good job for 95% of shaky video files without using the Expand option. In the following promo video, I've used Strong mode for a stabilisation of the 1st video (Expand = "0", by default) and Camera Lock mode for the second video: https://www.youtube.com/watch?v=oWu-IlXTDvE P.S. Jill, thanks for your comment!
-
Hi Jill, That is what I understand it to mean but always thought that the zoom required to accommodate the stabilisation was an integral part of the choice of the option selected. Tony
-
As I understand it, when you stabilise, you could end up with black edges/corners as it may crop the image to be able to align each of the video frames. By Expanding, you effectively zoom into the image a bit to remove these. Jill
-
How does the "Expand" feature in the Stabilisation section work? TC
-
You are welcome. I hope this video helped you understand how to work with keyframes.
-
Thank you AleAle5025, I appreciate your help, the tutorial looks great!
-
Similar. The style consists of five Photos. https://disk.yandex.ru/d/3XDydkixMcrPgw
-
Smithbrg. If you watch the video, you will understand how to work with dots. The proposed first variant can be simplified. Download the archive with the video. https://disk.yandex.ru/d/WV1I9F1C-CNKhA
-
Merci Igor pour ce partage, PTE....Le Diaporama et le montage par excellence. Meilleures salutations
-
Free Music / SFX Resource - Over 2000 Tracks
Eric Matyas replied to Eric Matyas's topic in General Discussion
Hi Everyone, This week's brand new free-to-use-with-attribution music tracks are: "THE GRUMPY MONSTER'S CASTLE" (LoFi) "TREASURE CAVE" (LoFi) "OF LEGENDS AND FABLES 3" (LoFi) "TROUBLE IN DREAMLAND" (LoFi) "CANDY FACTORY" (LoFi) You'll find them here: https://soundimage.org/fantasy-13/ AD-FREE and COMMUNITY SUPPORTED My website is 100% ad-free and community-supported. If you possibly can, please consider making a small contribution here: https://soundimage.org/donate/ Enjoy, please stay safe and keep being creative! 🙂 - Earlier
-
Robert Keeping things simple is often the best thing we can do, otherwise the fancy presentation can overwhelm the images we want to show. Our creativity can get diverted to parts of the project that are less important.
-
Thank you, Jill! I appreciate your help, Robert
-
Don't put yourself down, it is possible to teach an old dog new tricks! Keyframes are really easy to use once you undertand the principle. You have a start point & an end point. Simply position your Object at the Starting postion on the first Keyframe Right Click on the Keyframe & select Clone Move the Keyframe along the Timeline to where you want the movement to end & then position your object in it's end position. PTE works out the movement in between. So for what you were trying to do in having a small image move off screen. 1st Keyframe, your image is on screen in it's starting postion. 2nd Keyframe move your image to be off screen That is all there is to it. Jill
-
Hello everyone, I want to update you on this post. I am 85 years old and too old and stupid to use keyframes. To the kind forum users that tried to help me, I apologise for wasting your time. I changed the plan, and just made a simple slideshow instead. I am a long time user of PTE but have always made simple slideshows using styles & themes that are built-in and ones shared by others, and that has always met my needs. Best Regards, Robert
-
OK Good luck
-
Good Morning Barry,you created a video tutorial showing how to create the opening of a book and turn the pages, you later updated the labeling to make things clearer for the user, the file i sent you is the updated version, last night I found your excellent series creating a 3D Book with PicturetoExe so in a way it is Problem Solved. it would have been nice to use and learn from the style you gave with the video, but I will manage with the goldmine I discovered last night. A Massive thank you is in order, the 3D Book has all the info I hope I will need for my project, Thank You for your time and trouble. Regards Trevor
-
The file downloads but is not seen by PTE AV Studio and I don't recognise the name. What is it your actually looking for
-
Hi Barry, so good of you to reply in person, in no way was this a criticism of you, your website, or your undoubted talent, l it had a .pteeff tag i don't know if that is relevant, I will attach the style to this message, I am trying to build my own version of a photo album, I know its been don't many times and undoubtedly better that I can produce (at the moment 8-) want to build it to teach myself the technique, Thank you Barry, your video's have been a great help, I especially like what you did in Photoshop for Text effects. Page With Labels.pteeff