-
Posts
212 -
Joined
-
Last visited
Everything posted by jmG-06100
-
Thanks a lot, Barry, for this new tutorial focused on one item in PTE-AV-Studio; It will be a great help for my own presentation to my user's group at the photo club. Concerning the time that it takes to read a caption or scrolling text, I have been advised to measure the time it takes me to read my own text and then double that time for the reader. Would you agree that this can be a good starting point?
-
Many thanks, Barry, for spending the time to create yet another tutorial and offering the related styles. That should help anyone faced with the chanllenge of using portraits on a horizontal screen.
-
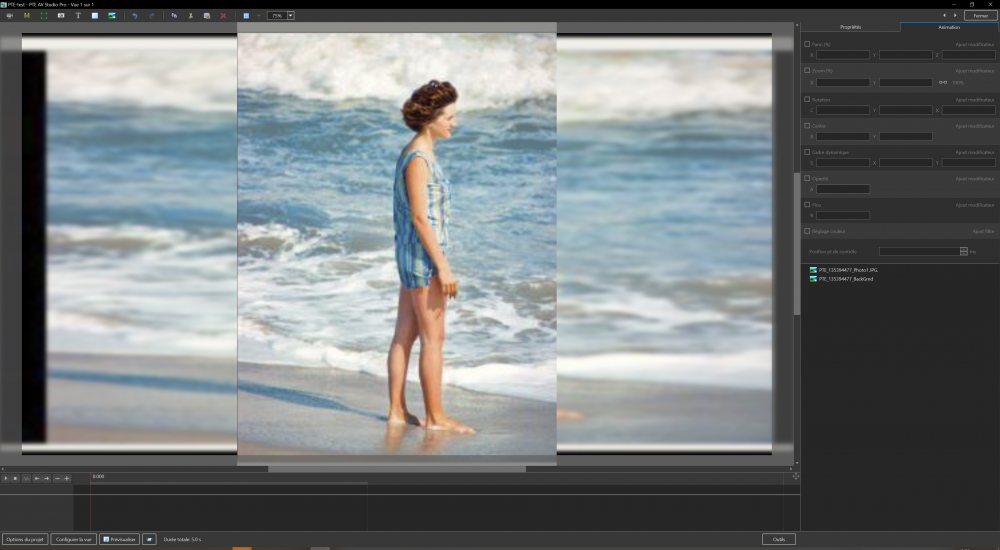
Hi Canico (1) With PTE directly The quickest way to use a vertical photo among a horizontal slideshow is what you often see on TV for the news, when a smartphone has filmed an event in a vertical frame: Make a background with the initial image stretched to fill the whole width, either globally or only horizontally. Also blur that background 10% to 50% or so. Make sure the main strong horizontal lines coincide (horizon, road edge, ...). (2) With Photoshop or other advanced photo editing software As you can see, I used the "Edit / Fill" feature, with the option to use the image content. Depending on the subject, you can get amazing results. I have worked on a copy of the picture on a layer where I have deleted the two black vertical bands on either side, making them Transparent. Then in two successive steps, I have selected half of the vertical band closest to the original image and performed the fill operation; Then the outermost void column was filled, with the "good" result you can see (check the shadow on the sand). Do small steps if the initial "fill" is not satisfactory, so that only the image content closest to the "patched" area is used. Further enhancements are possible to clean-up the works, using other tools. However, during a slide show, the main attention is on the center of the image, not so much on details around it. (Actual Photoshop menu command , in French = "Edition / Remplir / Contenu pris en compte")
-
Thank you, Gary, for the explanation. The servers for GrosFichiers are in Switzerland and in France, where most of their clients reside I presume. Actually the link you got indicates that you will be allowed up to 50 GBytes per each transfer (after a donation), and that if you donate 5 €, 10€ or 20 € you will have no publicity for 1, 2 or 6 months respectively.
-
Just do a "Donation" like I have, after many months of use, and then the space will increase (I believe). https://www.grosfichiers.com/en/FAQ.html
-
I read "The maximum size per sending is 50 GB, for up to 300 files at a time. The files remain on the company servers during 14 days maximum." I have actually sent large video files of 40 GB a few times. I have once made a small contribution to the web site, which may very well have increased my allowable usage to the 50 GB maximum value.
-
<<GrosFichiers is a free service for businesses and individuals to send at once up to 50 GB files to one or several recipients through a web browser such as Internet Explorer, Firefox, or Safari. GrosFichiers acts as intermediary between the sender and recipients. Each recipient receive by email a link to download the files, which are stored on our servers until then.>>
-
You can send the files once to your own e-mail address (or a dedicated secondary address). Then you are given a DOWNLOAD LINK that you can forward to anyone, without going through GrosFichiers. For instance, for the sake of demonstration, here is an old URL: https://www.grosfichiers.com/dKgrqvxsFgu (but the link is no longer valid).
-
I tend to prefer using https://www.grosfichiers.com/en/ because it allows (for free) larger files than WeTransfer. Moreover the files are not in the USA, which provides some better level of privacy. ("Gros Fichiers" means "Large Files" in French, and the web site is also www.grosfichiers.ch, that is Switzerland).
-

A new field for developer's notes
jmG-06100 replied to Tonton Bruno's topic in Suggestions for Next Versions
Good idea indeed, so that I can quickly understand why I have several versions of similar projects (intended to different audiences, different durations, alternative musics, ...). Not that easy to squeeze the info into a modifiled project title. -
The TEXT ZOOM value is directly related to the NUMBER of lines in your text, and it changes for each line that you add (or substract). Choose 100% and the text will fill the frame from top to bottom (in height). Have you tried to read the on-line user manual: https://docs.pteavstudio.com/en-us/10.0/how_to_v10/add_text?s[]=font&s[]=size <<Note also that one line of Text in the above example = 15% Zoom. Two lines of Text = 30% Zoom; three lines of Text = 45% etc. This relationship will continue until the size of the “bounding box” is altered via a mouse action.>> <<In the next Example it can be seen that One line of Text at 6% gives the same Font Size as 16 lines of Text at 96% Zoom. Knowing this relationship allows the user to create a consistent Font Size across multiple Slides.>>
-
Quick fix. Thanks Igor for this problem solving.
-

error opening P2E AV Studio10 pro [SOLVED]
jmG-06100 replied to stanle hill's topic in Troubleshooting
Hi! Have you tried to uninstall and install again? That sometimes does the trick for other programmes. -

Auto-detect scanned slides' black borders & crop them
jmG-06100 replied to goddi's topic in Equipment & Software
Welcome here, René. I am impressed by your scan of 7000 slides! How long did it take you? Months? -
Ian, just another idea. When I need to send *.EXE files, I often have to rename the file as a gentle *.TXT file to fool the mail system. Once received, the *.TXT file has to be renamed to what it actually was with the original filename extension. You probably could do the same with your *.MP4 files, as long as there is not a stringent file size limitation with BOX. Worth a try?
-
Je pense que c'est un faux problème car il suffit d'aller dans "Fichier / Ouvrir" (ou bien "ouvrir un projet récent") pour que cet autre projet remplace tout simplement le projet en cours. C'est le cas avec MS/Windows 10 pour moi. In fact, this is not an issue at all since once PTE is open with one project, it is so simple to go to: "File / Open" or "File / Open recent project" to have that other project take place instead of the previous one that is no longer active. At least with MS/Windows 10 for me.
-
Maybe with a high definition screen, you could perform Screen Captures (Keys: "Alt" and "Print Screen") for each page (presumably they are still composite images without any animation) and then combine all pages (*.png files in my case) into a PDF document? That could be a workaround.
-
Problem "solved", then. Great.
-
Yes, you can have a uniform background of a single colour (green for instance) in order to remove it and replace by another image or vidéo, the way they do for the TV broadcasts of the weather. Take the French guide book page 112 (double page 57/93) and it is all explained there by Jean-Charles Pizolatto. <<Incrustation ou Chroma Key : L’Incrustation consiste à rendre la couleur d’une vidéo transparente pour la supprimer (ici le bleu) et laisser apparaitre ensuite une image ou une vidéo de fond par surimpression.>>
-
Fingers crossed! It is good to be able to keep working and keep the mind busy on positive projects.
-
I'm eager to hear of the beta release too. All the best to the development team who can work, hopefully, at a safe distance from one another thanks to teleworking on their computers. (I have nothing to add, as in fact I only wanted to be "notified of replies" but did not find how? without taking part in the discussion).
-
Straight out of the box, the BenQ is already close to optimum calibration, so why not? I had a bad experience in the past with a Samsung monitor, very bright and with strong colours (for gamers, I suppose), so that I dimmed all my photos and decreased the saturation until the image looked natural on my screen ; Sent for print to get a thick book of many pages, all images were very dull and almost colourless, and that's when I started to learn about screen calibration. You should not have such a problem with modern monitors intended for photographers.
-
My first wide gamut monitor was from "LaCie" with its own calibration sensor "blue eye pro" (in fact an X-rite model, rebranded) and I was told (by a specialist in colour management) that its useful lifetime was less than three years. So, yes, you need to use a recent calibration unit and renew it every two years or so (unless the technology has changed drastically).
-
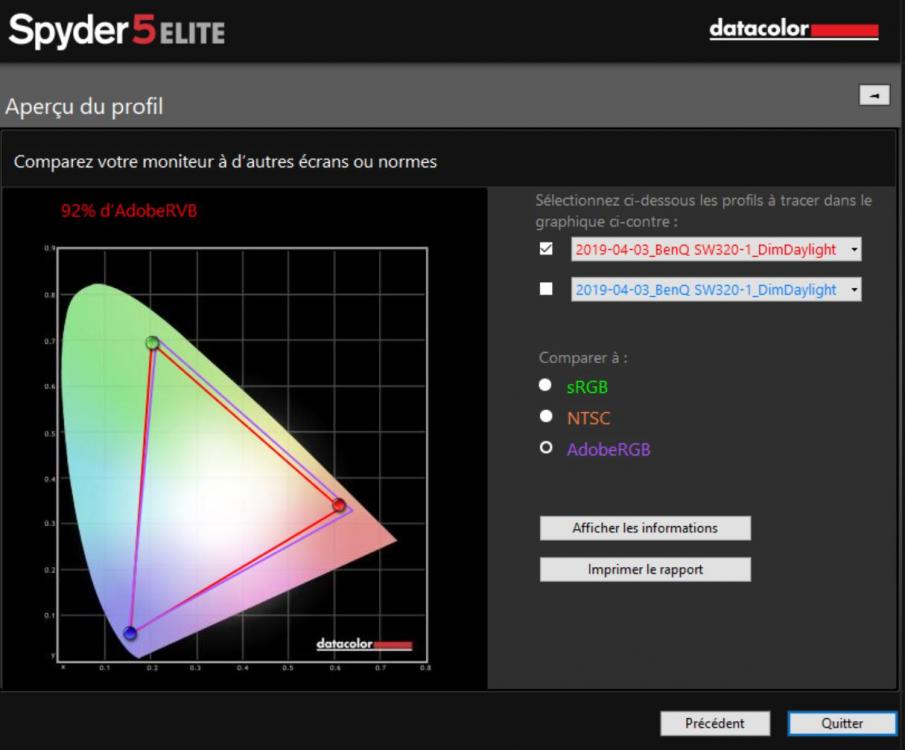
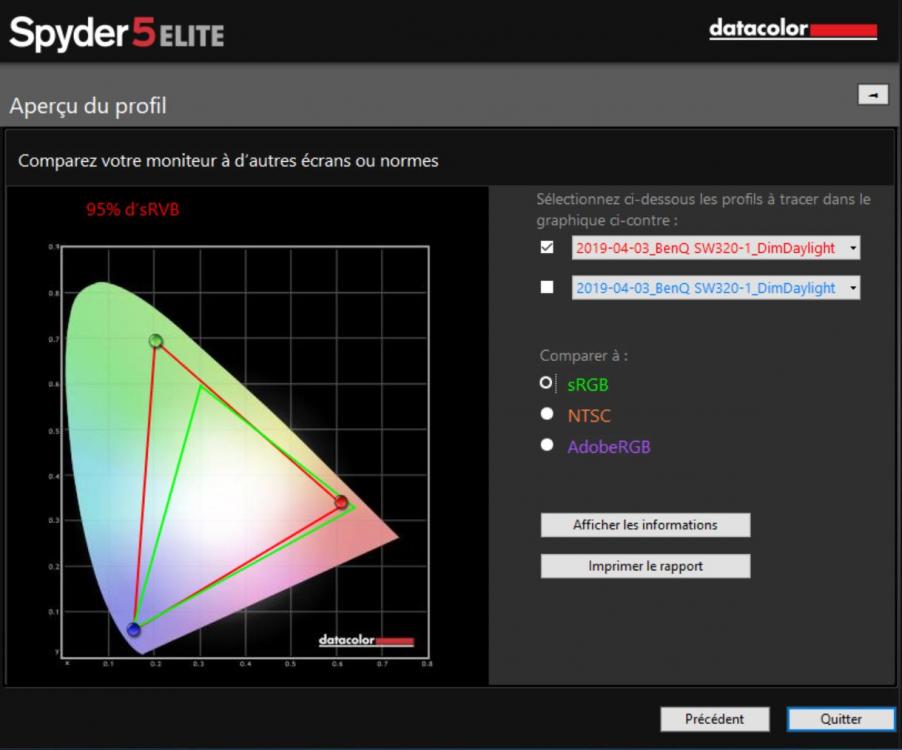
Hi barry! I have chosen a BenQ SW320 monitor (4K) and have been very happy with the high quality of this wide gamut product (one year of use). It comes with its vizor to protect from stray light from the sides and the top. The size of 32" (81 cm) is fantastic for editing photos and also to allow multiple pages on one screen. Calibration can be performed with the X-rite sensors and also, as in my case, with DataColor products such as the Spyder sensors. The red triangle in the charts below represents my RGB space, for my own screen, after the calibration process. Any colour within the triangle is accurately displayed on the monitor. Note that the scale of the chart gives more emphasis to the green area than is actually visually noticeable (a question of scale). As you can see, 95% of the basic sRGB space ("small RGB") is well covered with a slight loss along the purple line (from Red to Blue) but with much more green space. The Adobe RGB triangle (in purple) is only slightly bigger than the actual displayed space (in red). The price level makes it very attractive compared to the higher end products (Eizo, e.g.) and the potential slight difference in quality is of no object for my personal use. That's what I learned from several technical reviews in my camera magazines. Please note that BenQ have two product lines, one (SW) for photographers (mine) and one (PV) more oriented towards video use and specific cinema calibration needs. I take this opportunity to stress the need to have a regularly calibrated monitor when editing photos, so that colours are properly displayed, as well as the black to white gradation (nuances of grey). Failure to do so makes one "blind" with no control on the result when the images are shared with others, displayed on an other monitor or TV, shown on a screen via a projector or printed on paper. Editing in the widest possible colour space (Prophoto RGB for instance) is highly recommended, with at least 16 bits per colour channel. But that is another topic altogether.
-
Hi Canico In the existing text, you can do a "Cut" of the part of the text you want to separate from the other, then create another Text box (see advice from Barry) and "Paste" the copied text there. You end up with two separate text objects that you can size the way you want.


