-
Posts
405 -
Joined
-
Last visited
-
Days Won
1
Everything posted by stranger2156
-
Igor, Are you saying that the style in question does NOT use scaling of keyframes on time changes? Is it somehow noticeable in Barry's video? The fact is that I recreated this style in two versions, when the checkbox is on the specified parameter, and when it is unchecked. But this does not affect the problem described in the topic if the near keyframe has a time of exactly 2 seconds.
-
Hi Alex, are you talking about an audio track from a video file?
-
-
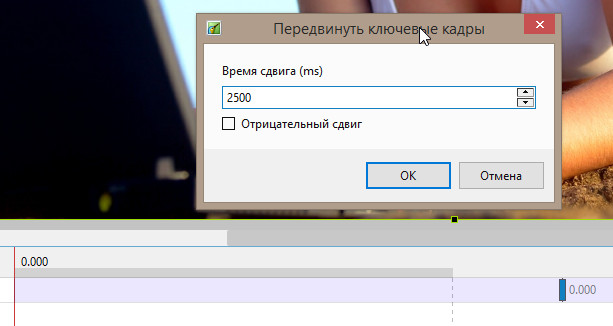
I also observe the same behavior of a keyframe if it is on a transition boundary (regardless of software version, v.10.0.14 and v.10.5.2 were tested). The effect of the following slides on keyframe offset is, of course, a mystery. I can only assume that this is due to the subsequent transition to the slide next to the selected four slides before we use the style. Note that shifting the first keyframe 0.001 seconds (one way or the other) from the transition boundary solves this problem. Tricks like this, such as decreasing the time of the last keyframe by 0.001 seconds from the end of the slide, also solve the problem of integrating a custom layer, for example, from a shorter slide to a longer one. Only then will the last keyframe preserve the original time of the shorter slide. P.S. It can also be noted that with the same approach to the last keyframe (at the transition border), its position does not change in any way. Regardless of the presence of slides next to the selected group (to apply the style) on either side. Paul P.P.S If we proceed from the principle that the first keyframe should not be on the transition border, then such surprises can be avoided. But the problem for many is that you need to know about it. ))
-

Custom Transitions PTE AV Studio 10.5.1 [SOLVED]
stranger2156 replied to LucEm's topic in Troubleshooting
As I understand from the video clip, after creating a copy of the transition, there are no pictures / videos in it. The problem was only partially reproduced. Indeed, there is initially no content in the effect viewer for the transition copy. But after closing the window, everything is restored. By all appearances, content is written to disk, for a copy of the transition, only after clicking on OK in the effect window. -

Custom Transitions PTE AV Studio 10.5.1 [SOLVED]
stranger2156 replied to LucEm's topic in Troubleshooting
denisb, from the video file, we do not see at what stage the inscription appears on the image in the viewing window. It would be nice to see how the transition works before creating a duplicate, or even better to look inside to understand the reason for this "bug". -

Custom Transitions PTE AV Studio 10.5.1 [SOLVED]
stranger2156 replied to LucEm's topic in Troubleshooting
Hi LucEm, as an interested user of the PTE program, I would like to ask what exactly do you mean by errors in the custom transitions module? I'm just curious because I often create transitions in the program, of varying complexity. Paul -
Matt, Judging by the link I gave above, there is one free app under # 3. DeShaker. There is also a video tutorial on this application, maybe it will suit you. Paul
-
In addition to the above ... an oval gradient mask is used in two places, which opens the visibility of the upper edge at the borders of the images (see the picture). It looks like a small blot, which it is desirable to eliminate by adjusting the density of the gradient at the border of the image (from light to completely black).
-

Two simple styles for full-screen photos
stranger2156 replied to stranger2156's topic in Styles & Templates
Thanks, smithrg! -
Matt, here I've added two simple styles that might work for your presentation. Paul
-
A couple of simple styles for a full-screen demonstration of view photos, landscapes, architecture, objects, city scenes, etc. etc. Each style applies to 5 landscape photos, styles can be combined in one project, select the required number of photos (no limit on the number) and apply to them one style or another. Missing photos, after applying the style, will be immediately visible in the slides, in which gray Placeholder pictures will stand in their places, then we simply delete such slides. In the demo video, both styles alternate, the only difference between them is that in one at the joints of the slides uses a technique from cinematography (a quick smooth transition through a black screen), in the second style a simple AB dissolution transition is involved. Paul Slide Style 1.ptestyle Slide Style 2.ptestyle
-
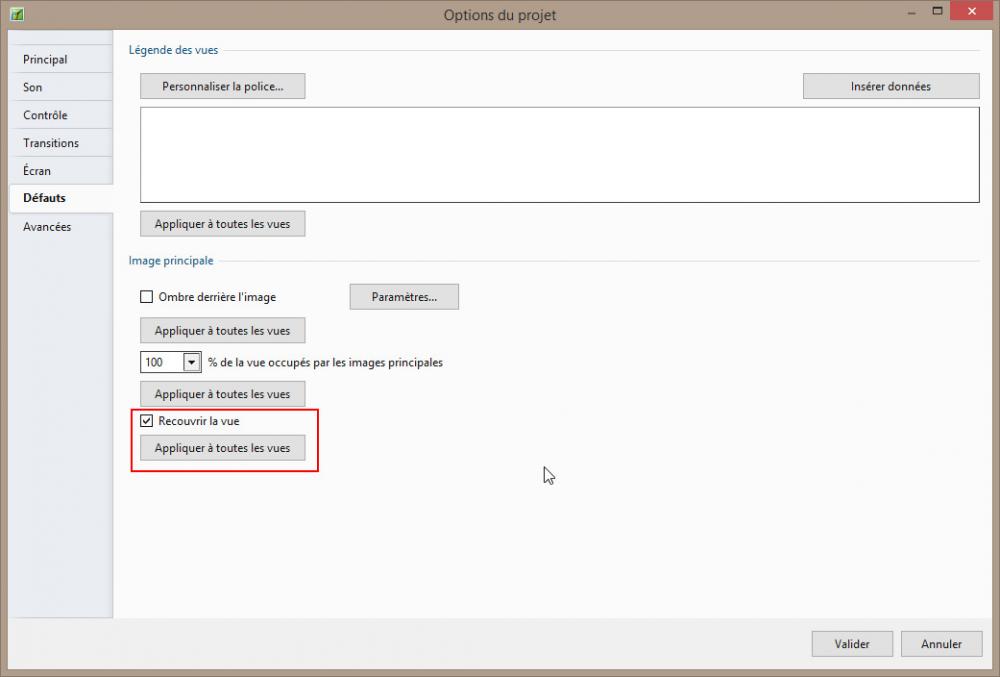
Hi Matt, when creating this kind of slideshow (full-screen display of photos and videos), it is advisable to adhere to some approaches to the process. - initially set the "Cover" screen fill for the project in the project settings, so that there are no black bars around the edges for non-format photos (see the picture) - avoid complete static on the slide for photos (when the photo is displayed with absolutely no movement, such as light zooming, plus or minus, panning and rotation, these can all be combined or used separately) - when adjusting the dynamics of the photo, make sure that the photos always completely cover the screen - it is advisable to do the dynamics of images at the junction of slides, as if in continuation, from one slide to another (in practice, this means, for example, if you increase the photo by + 10% using + 2 ° rotation, closer to the end of the slide, then by the next slide you can do this - zoom 110% ->100% and rotate in the opposite direction, -2 °->0°), there can be many options and combinations - handheld video, preferably stabilized, there are many programs for this, including free ones, see some recommendations at the link https://filmora.wondershare.com/video-editing-tips/video-stabilizer-software.html P.S. I liked the views of the terrain in the photos. Paul
-
smithrg, Rene, Henry, petitsaxo thanks for watching! After applying the style, you can change the slide time from 13 to 20 seconds, for example. When changing the time of the slide, make sure that the "Scale time points of objects" checkbox is checked in the "Main" tab of the slide settings window. This is necessary so that the keyframes are positioned in proportion to the new slide time. Paul
-
-
Ae project adapted for PTE AV Studio Pro, created exclusively by means of PTE. Without using any footage from the project, the only footage was made by me in Ae for folded corners of photographs. Everything else is done according to the demo video. This example shows the excellent capabilities of PTE to create projects at the level Ae, all you need is good imagination and certain skills, well, or Ae's demo videos, which give us visual insights into scenarios. For a style, you need 30 photos of any format, but it is optimized for landscape aspect ratio 3: 2, although 16: 9 and 4: 3 will work. You can also add portrait photos, but they will small size on the screen. In the demo video I made, for example, some slides with different photo formats. P.S. A special transition in 4 directions is integrated into the style, with a blurred joint of slides. Paul Card display.ptestyle
-

Full Screen View (F3) of File List [SOLVED]
stranger2156 replied to tom95521's topic in Troubleshooting
In the latest version 10.0.14, everything is the same. It would be logical to disable the Convert / Trim Video Clip line in the large file list window if this is only supported in the small window. P.S. As far as I understand, in previous versions this circumstance did not bother anyone, to convert and crop video (if necessary) only in a small window of the file list. Paul -

Congratulations on the issue of Release Candidate
stranger2156 replied to macian's topic in General Discussion
I also noticed that there is no Release Kandidate 2 in the program's help for the second release. Written simply by PTE AV Studio 10.5 Pro Paul -

Move keyframes with CTRL + E [SOLVED]
stranger2156 replied to Jean-Cyprien's topic in Troubleshooting
Apparently I was looking at 10.0.14 Now I checked it again, in version 10.5 - the result is the same as in your screenshot. -

Move keyframes with CTRL + E [SOLVED]
stranger2156 replied to Jean-Cyprien's topic in Troubleshooting
-

Demo video with an example of handwritten text in PTE
stranger2156 replied to stranger2156's topic in Slideshows & AV Shows
Thanks Tauratinzwe, vbl2007 for your comments! The concept of 'more natural' is purely subjective. I positioned the pen the way I was taught in my spelling class at school. )) Paul -
I don’t think that anyone on this forum will be interested in a handwritten font with Cyrillic, I’m posting it just to demonstrate the capabilities of the program. )) I got interested in handwriting after I got acquainted with the work of Handwriting Text from our colleague thedom. At first I wanted to use the technique from this work, but later I came to the conclusion that it is very limited in terms of practical application. I had to create a new concept, flexible enough, which can already be seen in the presented demo video. Paul
-

Discussion of PTE AV Studio 10.5 for Windows (Beta)
stranger2156 replied to Igor's topic in General Discussion
On the issue of highlighting the added files to the presentation ... the proposed solution (as before, highlighting only the first indexed file in each slide) does not solve the issue on the merits. Be able to have a complete overview of the files added to the presentation, both indexed and all others. Otherwise it doesn't make much sense, just change the color. As for the color, the blue is not very noticeable, I would prefer bright red or green. Paul -

Discussion of PTE AV Studio 10.5 for Windows (Beta)
stranger2156 replied to Igor's topic in General Discussion
When I delete slides, the selection in bold blue is immediately removed in the file list. PTE for Windows 10.5 Build 28.


