goddi
-
Posts
3,593 -
Joined
-
Last visited
-
Days Won
26
Everything posted by goddi
-
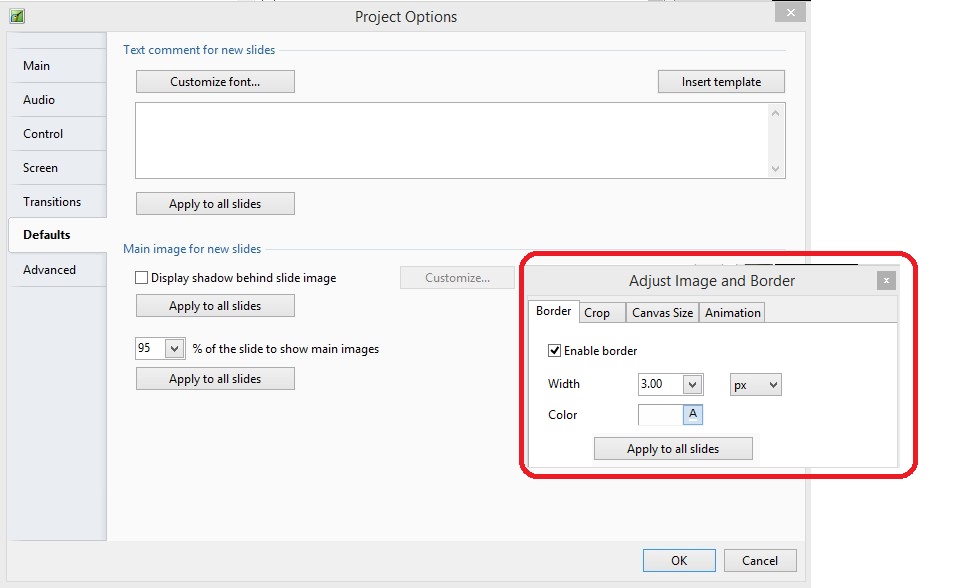
Add 'Adjust Image and Border' to Project Options/Defaults
goddi replied to goddi's topic in Suggestions for Next Versions
Dave, I don't think that Styles should be used for something that is basic. It should be available as a Menu item. I look at Styles as something similar to macros (Excel) or actions (PS). Creating basic borders, as in 'Adjust Image and Border', I think, should not be viewed as such. Gary -
Add 'Adjust Image and Border' to Project Options/Defaults
goddi replied to goddi's topic in Suggestions for Next Versions
Peter, I tried out your steps. Yes, I see that it works. But, who would ever realize that this is what it can do??? I hope that Igor will work out a menu item as I have described. The method you describe works as you construct the show (as you add each new image). If you want to add borders after you have placed all of your images, this method would not work...unless you removed and re-added each image. There should be a better method. But thanks for letting me know how the 'Save and use by default' works. Thanks. Gary -
Greetings, When I want to add a border to all of the images in a show, I have to do it in O&A, image by image. It seems it would be more convenient if we could add a border to all the images if the same 'Adjust Image and Border' was available in Project Options/Default (with the ability to remove/adjust the results on any particular image by doing so in O&A) ). I know that the current 'Display shadow behind slide image' adds shadows, but I want a crisp border, not a shadow. Gary
-
Dave, That is exactly what I said...."You have to capture the entire screen or the entire active window's contents", meaning with Alt+PrtScn. But what if you want to capture just a portion of the window you captured with PrnScn??? Can you? See attached. Gary

-
Dave... Oooopppsss... I meant Paint. I still don't see PrtScn being really as useful as Snip, etc. You have to capture the entire screen or the entire active window's contents. Then you have to crop them, if you don't want the entire area. Snip and ScreenCapturePrint does it all in one action. Gary
-
Dave... Hmmmmm.... I don't use PrtScn because I can not size the exact area I want to make a screenshot of. You can only capture the entire screen or, with Alt, you can capture an active window. Maybe I am missing something. But programs like ScreenCapturePrint.exe and Snipping make creating screenshots of any area of the screen very easily. For text, I open the screenshot into Paste (corrected...I meant 'Paint') and I can do text and symbols very easily. I've now added Snipping to my Desktop, too. Thanks. Gary
-
Dave, I have been using the ScreenCapturePrint.exe (free) to do my 'snipping'. But I did find the Windows Snipping tool is also in Windows 8. I have attached a screenshot for those who are using Win8. Gary

-
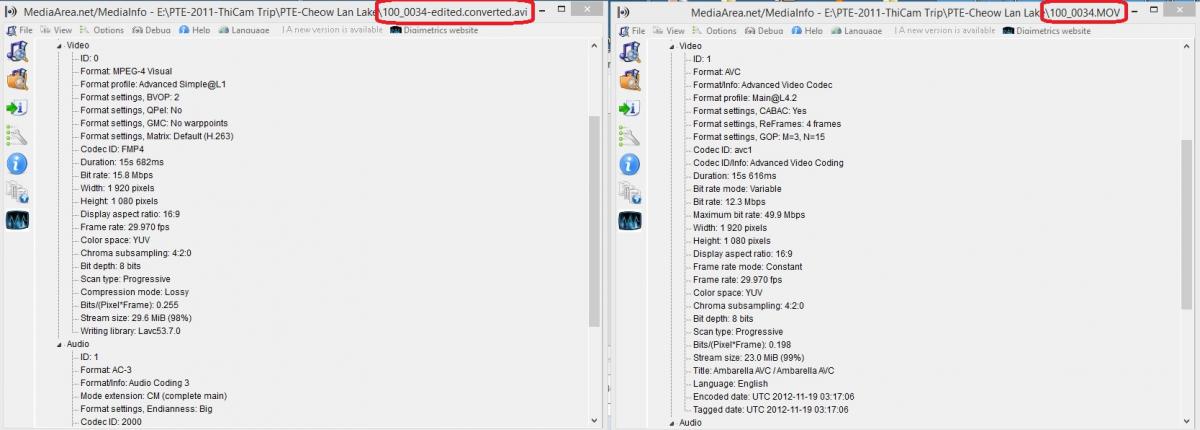
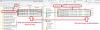
Greetings, This topic might have been brought up before but I could not find it in searching the Forums. And not being able to search on a 3 letter word does not help. My question is, why do MOV format video clips play jerky in the Mini-Player (preview window)? Nor does it play smoothly in the Convert window. Yes, if I Convert the clip, it plays fine. But I'd like to be able to preview the MOV clip before I choose to convert it. It plays fine in video players. I attached a Media-info screenshot of an MOV clip that is the original and one that has been Converted. Gary
-
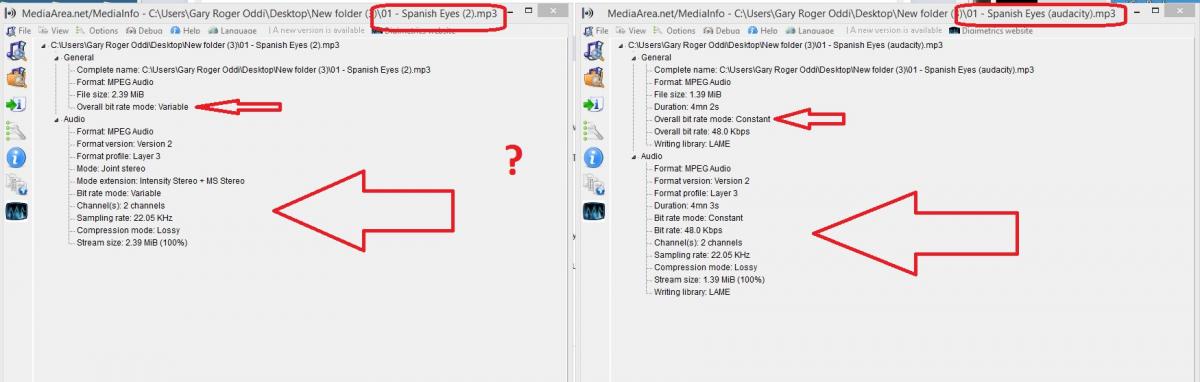
I ran both audio files through MediaInfo. See attached. Maybe someone can determine what the differences mean. Gary
-
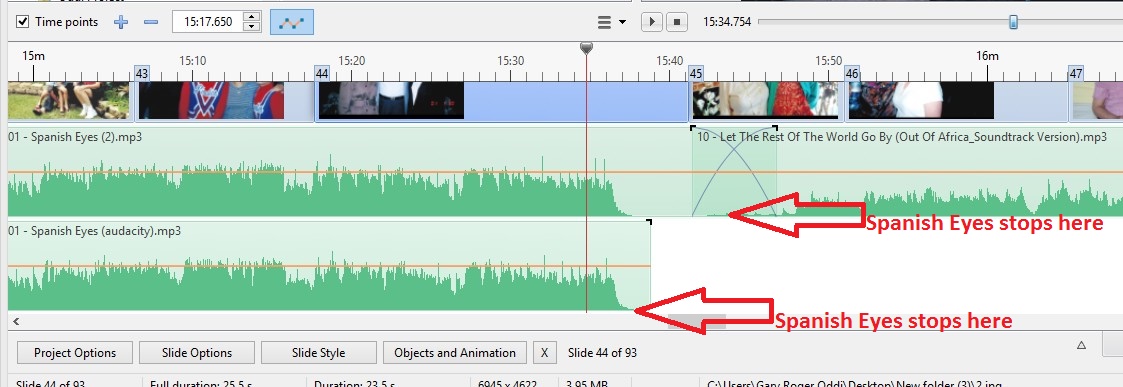
Greyspider, I took a look at your show. I think there is something going wrong with your audio files. I took a look where you have the Spanish Eyes mp3 playing in Track 1. I noticed that the song plays past where you see the actual ending of the sound wave. I opened that mp3 in Audiacity and exported it. I put that version in Track 2, just below your original Spanish Eyes. So both start at the same point in the show. If I mute my version of Spanish Eyes in Track 2, your version plays past the ending of where you see the audio wave stops. Strange. So I muted Track 1 and played only my Audacity version and the Spanish Eyes stops playing at the actual end of the sound wave. I would pass all of your audio files through Audacity, export them, and bring them back into your PTE show. There seems to be something going on with your sound files. I notice too, at the end of your Blue Daubje audio file, the music continues past the end of its sound wave, where you would expect silence. Gary
-
Dave, After much testing, I have come to the conclusion that you should not Convert/Trim a video clip by clicking on the video clip in the Slide List. If you try to Convert/Trim a video clip in the Slide List, you will get your trimmed video clip, but the video will stop at the end of the trimmed clip but the duration of that clip will not change to the shorter trimmed length. The duration will not change. The last frame of the trimmed video will stay on the screen for the remainder of the original video clip's length. In otherwords, the video clip's duration does not change to the trimmed length. So, it looks like you should only Convert/Trim a video clip that is in the File List (not the Slide List). If the a video clip is Converted/Trimmed when in the File List, and then you drag it down to the Slide List, the clip will be the correct trimmed duration. If you do Convert/Trim a video clip in the Slide List, you have to delete that video clip in the Slide List and then drag down the newly created Converted/Trimmed video clip from the File List. The duration of the Converted/Trimmed clip will then be correct. Whether I had the KFSD checked or not, I did not see any difference. Gary
-
Yes...Thanks... The file naming is not the problem, but it is nice to see it can be changed. The other problems, I hope, will be addressed by Igor. Gary
-
Dave, Yes, I see your method. I usually bring in the non-trimmed/converted video clip to the Slide List and see how it plays. Then I do a Convert of that clip and then do the 'Change Video File' to swap it out. You do the Trim/Convert before bringing it into the Slide List. If I do the Trimming of the '..converted.avi' file, I get the '...converted.converted.avi' file name, as expected. Dragging down the trimmed/converted clip from the File List to the Slide List, as you do, works. But if you want to do the 'Change Video File' to swap a clip in the Slide List with the trimmed/converted clip, it does not bring in the trimmed/converted version from the File List that plays correctly. It brings in the trimmed/converted version that freezes at the last frame, etc. It only produces the correct clip if you do the drag down method. So, if I decide to trim the video after it is in the Slide List, I would use the O&A/Properties method. However, it will give the 'freeze, etc' results. I have to drag it down to the Slide List to get it to play the actual trimmed version and delete the original clip that was in the Slide List. Or...I can go into the Slide Duration and manually change it to the new trimmed slide duration. I don't understand the Keep Full Slide Duration, so I never have it ticked. When I drag down a video, I always do it in the Slide View, not the Timeline view (if that makes any difference). I still think there is something not working right. I think your steps are logical and work; I think my steps are logical but don't work. Gary
-
Dave, Yes, the Audio File I hear after the 'freezing' of the last video frame is the inserted music...not audio from the video clip. It looks like your first method produces the same results as mine. Your Alternative scenario is interesting. When I try trimming a video clip (using the Convert Video Clip menu) that has already been Converted, and it is in the Slide List, the video's file name shows as '....converted.converted.avi' after the conversion. However, when it is played, I get the same results that the last frame of the video clip freezes and then continues playing the original duration of that clip. But I noticed you say you drag down the '....converted.converted.avi' file down to the Slide List. When I do that, I get the correct trimmed clip and it works as expected. And I have to delete the first '...converted.converted.avi' file that is still in the Slide List. But I also tried to do the same thing but use the 'Change Video File' method. This method does not work. It brings in the clip that freezes the last frame, etc. I have to actually drag the file down to the Slide List and then it will show the correct trimmed video clip. Very strange. Gary Added Later: To be clear, dragging down the trimmed file to the Slide List produces a different result than doing the 'Change Video File' method to bring down the exact same video clip into the Slide List. .
-
Dave, Actually, the added music track does not stop. The last frame of the video is frozen while the music continues for the length of the original slide's duration. When you say it makes more sense to Trim before adding to the slide list, are you saying to use a 3rd party program and NOT the PTE's trim function? If I am doing something wrong, what are the proper steps to use the trim function??? Gary
-
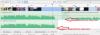
Take a look at this video I created. Link is from my Dropbox. http://db.orangedox.com/K9lvwrlWhm4r59vrVE/Trimming.exe Gary
-
I don't think I am doing anything wrong. After trimming off the beginning portion and some of the ending portion of a video clip, the video plays and the video stops at the point of the ending trim. However, the background music continues as if the video is continuing to play its original duration. Once I set the Slide Duration to the new trimmed video length, the video plays as expected. My point is that once you have trimmed the video in PTE, the Slide Duration should automatically reflect this new length. If I understand Dave's last posting, he is in agreement with me. It is an old problem that has not been addressed by Igor. Gary
-
Not sure what you mean. I have had a still image placed before and after a video clip with no problem. Gary
-
It seems to me that if you have inserted a video clip, its 'Slide Duration' should be the same as the 'Video Clip Duration'. When you trim the video clip, its duration has been shortened. There is no reason to keep its original 'Slide Duration'. What happens is the video clip will play up to the end of the trimmed video clip and then the last frame just stay on the screen for the length of what is shown in the 'Slide Duration'. If the 'Slide Duration' automatically adjusts, than the 'Slide Duration' will be the same as the 'Video Clip Duration' that was established during the trimming. Gary
-
How can I make my video clip brighter?
goddi replied to smokinggoldfish's topic in General Discussion
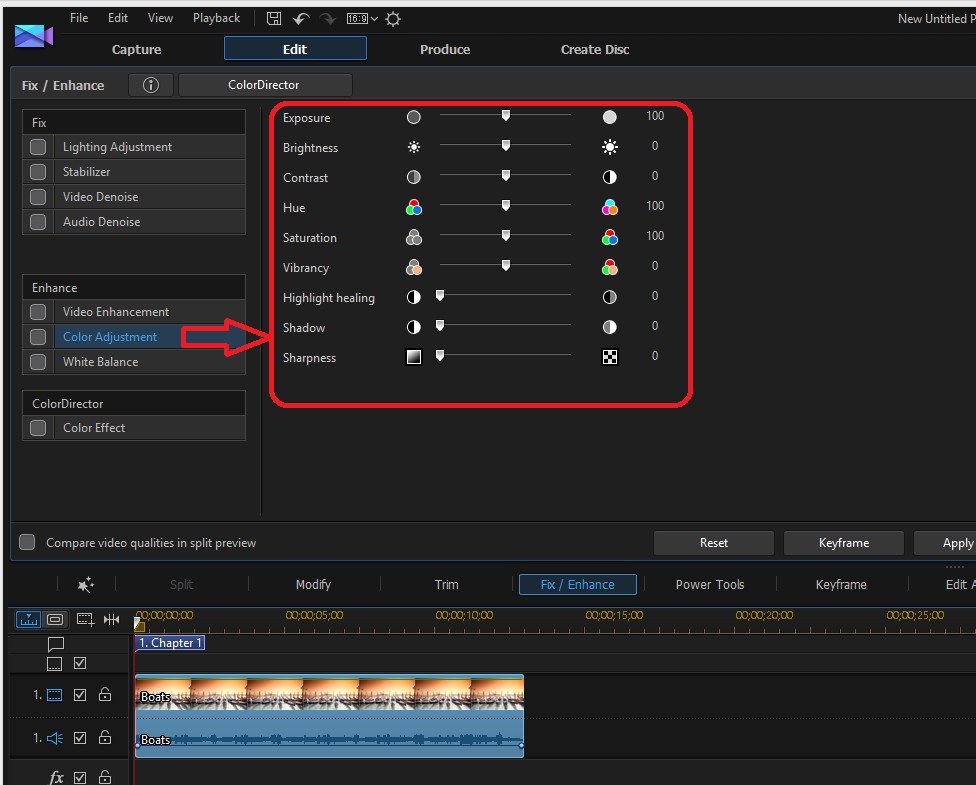
Greetings, I'd prefer a free version too, but I found one that is pretty reasonable for what it does. I purchased the PowerDirector13. Normally it is $69.99, but at this site,it is only $49.99 (download): http://store.hermanstreet.com/catalogsearch/result/?q=powerdirector It has many adjustments and enhancements for video. I just got mine so I am just trying it out. So this might help out. See the attachment. Gary
-
Dave, I searched for your discussion but I could not find it. Anyway, that seems to do the trick. After trimming the clip, I set the Slide Options/Slide Duration to what the trimmed clip was. But isn't this very non-intuitive??? Why shouldn't Slide Options/Slide Duration automatically be adjusted to match what you set it during the timming??? Or, if there is a good reason not to make this automatic, perhaps there should be a check box next to 'Duration' to give you the choice? Thanks... Gary
-
Greetings, Normally, I trim my video clips using another software program. It removes the unneeded parts of the video clip and therefore makes the final PTE file smaller in size. However, I have now been trying to use the video editing menus within PTE but I can not get the desired results. I have tried both of the methods in the OnLine help: Online Help: http://docs.pictures...en/video/addvid and http://docs.pictures...ideo/properties. For example, when I trim out the beginning and the ending portions of a video clip, I expect only the remaining portion to play. However, when I preview it, the beginning shot of the video clip stays frozen until the non-trimmed portion plays. Then, the ending shot of the video clip stays frozen until the normal length of the original video ends. I see that you can trim video in either the O&A's 'properties' menu or in the 'Convert Video Clip' menu. If you use the 'Convert Video Clip' to trim the video, you have to convert and re-conver the clip each time you use the trim function. If you want to use this menu again to trim, you get a '...convert.convert' file. So this only helpful if you want to keep the first converted video length and make a second one with a different filename. But, still, it does not actually produce the trimmed video. So I then used the O&A Propertes method of trimming. But, it also, as stated above, does not give me just the trimmed portion of the video clip I am looking for. The initial video frame is frozen until the untrimmed video portion appears and plays; then it freezes again during the last trimmed portion of the clip. What am I doing wrong? And I notice that the Slide Duration does not change when you have trimmed the video. Shouldn't it automatically change to show the trimmed time? Thanks... Gary
-
My Windows8 is 32bit and it can read the correct size. Why not PTE? Gary
-
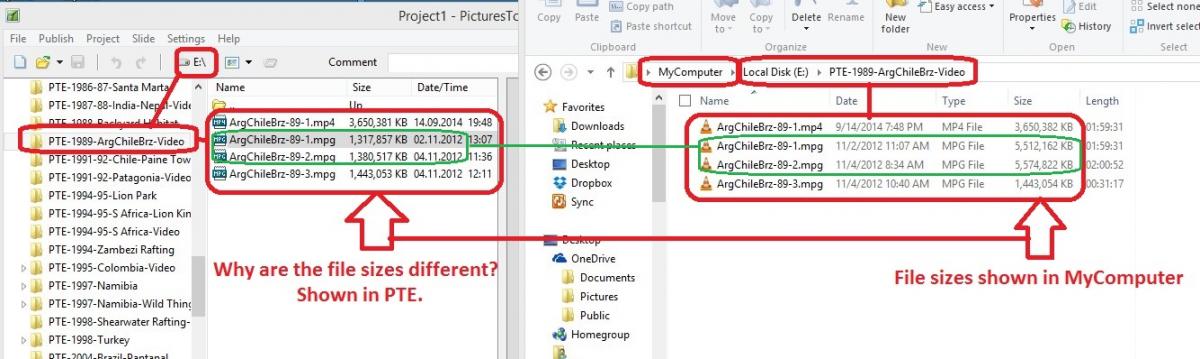
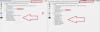
Greetings, The file size of to of the mpg videos are not correct when I bring them into PTE. See the attached screenshot. The mp4 file size if correct and one of the mpgs is correct, but two other mpgs are not. Yes, the files in MyComputer are large but can't PTE show the correct size? Any reason for this? Take a look at the two files circled in green. Thanks... Gary
-
Lin, I am sure it can be done, as you have, using other programs to create the border. Nice work. But I'd like Igor to let us do it within PTE. I don't know if it is technically possible to create a border with a Mask, but I think it would be very useful and add the to the creative possibilities. Gary