goddi
-
Posts
3,578 -
Joined
-
Last visited
-
Days Won
25
Everything posted by goddi
-
=================== Greetings, I took a look. Very nice. Well done. Gary
-
============================= Dan, I took a look at the specs of your camera. I see that it has the 'AE Lock' function. As I mentioned in an earlier post, I think your image is overexposed due to the dark subject you zoomed in on. There have been many suggestions to 'fix' this problem. But you have a function in your camera that, I think, will help you get a better shot in-the-camera. Take a look at this site that talks about using your 'AE Lock' function of your camera. http://www.learn.usa...k_article.shtml Basically, the AE Lock function will lock in an exposure setting. This can be used in the situations like you had when you were trying to take a shot of something very dark (or very white), or really any shot, if you want to take it that far. A camera tries to make every exposure to be 18% grey. So, if you want to be really specific, one would take an exposure reading off a 'grey card' in the light that is shining on the subject and lock in that exposure with the AE Lock function. Then compose your shot and take the picture with that exposure setting. But, if you don't have a grey card handy, you can take an exposure reading off of any other object that is 18% grey or close to it. Sometimes, green folage or grey stones are close, but you get the point. You can get a grey card and learn what other things out there come close to a grey card reading and then you don't have to really carry around a grey card. With this method, your shot in the camera will be much closer to what you want and you will have to do less post processing. And here is an interesting site that talks about using a grey card with some interesting samples of the benefits of using a grey card: http://www.digitalar...nstructions.htm Gary
-
======================= Dan, There is something I learned back in the film days, and it might also apply to digital cameras today, too. Maybe, maybe not but here is my take. The image looks overexposed. When you zoomed in on the dark object, the camera wants to make it '18% grey', an industry standard. But the light meter says, "Oh, it is almost black and I will open my shutter to let more light in to get close to 18% grey." So the dark object gets lightened. When you have a very dark or very light (snow) as your main object, the thing to do is to take a light meter reading off of something that is closer to 18% grey; then, hold that setting, recompose and take the picture. Or, in your case of the dark object, stop down an f-stop or two to compensate for the darker object. Or, with a very light subject, like snow, open the aperature a stop or two. Gary Link to how to use a grey card.... If you don't have a grey card, you can usually find something around you that is close. http://www.ehow.com/how_5986275_use-grey-card.html
-
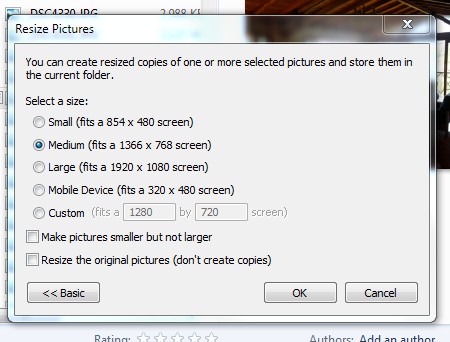
========================= Claudio, I have already responded to how I would reduce my video clips. I'd like to add now an easy way to reduce/resize single image files one at at time or in a batch. I can highlight a group of images in MyComputer and right-click on the highlighted group. Then I click on the 'Resize Pictures' button (I think this came from Windows7 and is standard--if not, I am not sure where this came from). Then I just choose from the size I want in the list. It is very quick and easy. Just another way of doing it. See the attached screenshots. Gary ADDED LATER: As I said, I am not sure if it comes with Win7 or I added it as another program. But I just found where you can get if if you don't have it. See this link: http://imageresizer.codeplex.com/
-
Igor, My suggestion is to be able to expand the O&A's play-line as we can do in the Timeline with the shift/mousewheel. This is especially helpful when you have a very long slide duration and you have to deal with keyframe placement or adjustments. When you enter keyframes in a slide with a very long duration, they can be sitting on top of each other because the entire length of the slide is compressed into a space that normally would have a duration of only a few seconds. Being able to expand the O&A's play-line will make it visually easier to deal with multiple keyframes. Gary
-
Adding Cloned Keyframes to a long video clip...
goddi replied to goddi's topic in General Discussion
======================= Peter, Yes, I have seen that the Key Frame Time box is a way of dealing with setting/adjusting keyframes in slide with a very long duration. I mentioned that in one of my previous posts above. But, it would be much easier to be able to expand the O&A's play-line (as we can in the Timeline) to get it close, and maybe use the Key Frame Time box to nudge it. When you have a very long duration slide, the keyframes practically can sit right on top of each other and it is difficult to deal with. Putting just one Text in the middle of a long duration slide will have at least 4 keyframes sitting on top of each other. Very hard to deal with. It's been a good discussion and I have learned some new things. Gary -
Adding Cloned Keyframes to a long video clip...
goddi replied to goddi's topic in General Discussion
=========================== Lin, No, I don't think I missed it at all. I understand all of what you are saying. My only point now is that it would be very helpful to be able to expand the O&A's play-line as we can in the Timeline. That would help to see and to place the keyframes more easily. Give it a try. Make one of the slides to be 35 minutes long. Put in a Text box to fade-in and to fade-out. The keyframes sit on top of each other in such a compressed state, it is difficult to work with them. I will put the suggestion in the Suggestion Forum. And thanks again for for your detailed explanation. Gary -
Adding Cloned Keyframes to a long video clip...
goddi replied to goddi's topic in General Discussion
===================== Lin, Thanks for the detailed explanation. I understand it now. My problem was that I have always started any text right at the beginning of the slide...so my brain was not getting the concept that you explained. I wanted it to start right at the beginning so it worked just fine. I never tried to put text in the middle of the slide's time as I am trying to do with my long inserted video clip. But...you did not get to my last question. Let's say I have the first Text's keyframe set at zero opacity. Then, I set its second keyframe to be 100% opacity to make it appear. Why is it slowly fading-in between these two keyframes? I have to put them almost on top of each other to minimize the fade-in time. The only control for the length of the fade-in is how close can I get the second keyframe to sit on top of the first keyframe without causing a problem. Is this the only way to control the transition from the zero-opacity-keyframe to the 100%-opacity-keyframe, by having to put the second keyframe right up tight to the first keyframe? What if I want some other transition of the text than fade-in? If this is true (having to put the 100% opacity keyframe right up next to the 0% opacity keyframe to reduce the fade-in), then we need to be able to expand/contract the O&A's play-line as we can do in the Timeline, using the shift-mouse wheel. With a long video (I am working with a single 35 minute video), the O&A's play-line is too compressed to make these fine adjustments or placements of the keyframes. When you are working with a 'normal' slideshow and the single image stays on for maybe 4-8 seconds, you have more 'room' to make these adjustments along the play-line. Same problem holds for the last two keyframe when you are trying to make the Text disappear. After all of this, I think my main points are that we need a way to 'expand' the play-line to help placement of the keyframes when you have a very long video for 35 minutes or if you even have a single image on for 35 minutes, for example. And, is there a way to not have the Text fade-in and fade-out in the beginning and in the end of the Text's keyframes? Not that it is bad, but I'd like more control or possible transitions available for the appearance and disappearance of the Text. Or am I missing something here? Gary -
Adding Cloned Keyframes to a long video clip...
goddi replied to goddi's topic in General Discussion
================== Thanks Peter, I had no idea. Gary -
Adding Cloned Keyframes to a long video clip...
goddi replied to goddi's topic in General Discussion
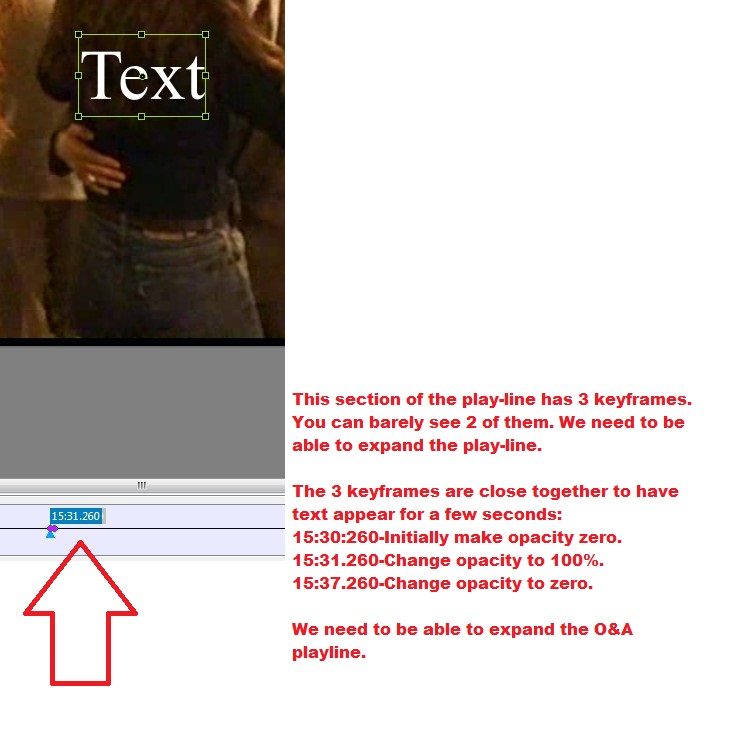
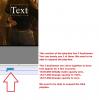
========================= Lin, Your clarification that the first keyframe is always set to 100% opacity helps me understand what to do. I tried your steps and it worked. But I may be doing it a bit different, though. I inserted a Text block. I moved the Text block's keyframe to a new position in the video clip where I wanted it to appear and made its opacity to be 0%. I then cloned that keyframe but did not move it and made its opacity to be 100%. I did not move it but it seems that PTE automatically nudges it a bit down the play-line, so the Text block appears nicely at that point. Then I cloned that 2nd keyframe and move it down the play-line to where I wanted the Text block to disappear and set its opacity to 0%. BUT, from the 2nd keyframe (opacity=100%) to the 3rd keyframe (opacity=0%), the Text is slowly fading-out during the entire segment. What is controlling the fade-in and fade-out of the Text blocks? I still find it extremely difficult to 'adjust' the 3 keyframes that are needed to accomplish this because the O&A play-line is so compressed. See the attached. But I have another question. In trying to adjust these 3 keyframes using the 'iterative' approach, I am confused by the differences in what the 'Keyframe' shows and what the 'Animation/Key Frame Time' shows. For example, for several Text blocks that I put in: The Keyframe shows 15.37.516 but the Key Frame Time shows 937516. The Keyframe shows 23:48.414 but the Key Frame Time shows 1428414. The Keyframe shows 14:59:000 but the Key Frame Time shows 899000. Only the bolded numbers correspond. How do I interpret this when I am trying to make adjustments to the Keyframes and they are not exactly the same numbers? Is this a bug? Gary
-
Adding Cloned Keyframes to a long video clip...
goddi replied to goddi's topic in General Discussion
==================================== Eric, I am not sure what you mean. I am basically using PTE to add Text into a video clip, or insert an image somewhere in the video clip for a few seconds. I have two issues. If the video is long, say 35 minutes, and you view it in O&A, the full 35 minutes is displayed in the O&A window. This makes it difficult to animate the Text because play-line in O&A is so compressed. Very difficult to fine-tune the animation. I'd like to be able to expand it as we can expand the Timeline by using the Shift/mousewheel. My question is, can this be done? But the other strange thing is that if you add Text or a graphic to a video clip it always starts at the beginning of the clip, not where you want to have it appear, say, in the middle of the clip, even if you move its Keyframe. Gary -
Adding Cloned Keyframes to a long video clip...
goddi replied to goddi's topic in General Discussion
================================== Lin, Is there any technical reason that would prevent being able to use the "Shift/Mouse Wheel" to expand/contract the O&A play-line as we can do in the Timeline? That would solve the problem. I think I'd rather use the Animation/Key Frame Time to adjust the Text block. Get it close, then adjust with it. This is difficult because the play-line is so compressed but it worked with the Text block I had at the beginning of the video. But I also have a question about putting Text in the middle of a video clip. I was able to put some Text in the beginning of my video, and animate it and make it fade-out. I was just tinkering around and tried to put Text so that it would appear only in the middle of the video for a few seconds. I could not. It always would appear at the start of the video and I could not get it to 'pop-up' somewhere in the middle of the video, even if I moved the Text's Keyframe. Is this, too, not possible??? Gary -
Greetings, Normally, when I have inserted a video clip, it has not been at the beginning of the show. However, I just started creating a show with a long video clip at the beginning and I want to put in Text in the intro to the video and animate it and fade it out after a few seconds. The initial video is 35 minutes long. So when I put in Text and then Clone the Keyframe to do some animation, it is very difficult to see and adjust the Cloned Text Keyframe. The entire 35 minute video is fitted into the O&A's play-line.There seems to be no way of 'expanding' the O&A play-line to be able to easily see/move/adjust the Cloned Text Keyframes by small amounts (as you can in an audio editor, like Audacity). When I try to drag the Cloned Text Keyframe by just a tiny bit, it snaps back to the left's beginning spot. I have manually entered Key Frame Time to move the Cloned Text Keyframe but it is hit and miss because the Cloned Text Keyframe is sitting practically on top of the original beginning keyframe. Is there an easier way of working with this type of situation or a way to expand the O&A's play-line to see the keyframes more clearly? Gary
-
Frame Engine Exception Error in 7.06 & 7.5Beta7
goddi replied to goddi's topic in General Discussion
=========== Igor, Thanks for the confirmation. Gary -
Frame Engine Exception Error in 7.06 & 7.5Beta7
goddi replied to goddi's topic in General Discussion
================= Fingers faster than brain... Gary -
Frame Engine Exception Error in 7.06 & 7.5Beta7
goddi replied to goddi's topic in General Discussion
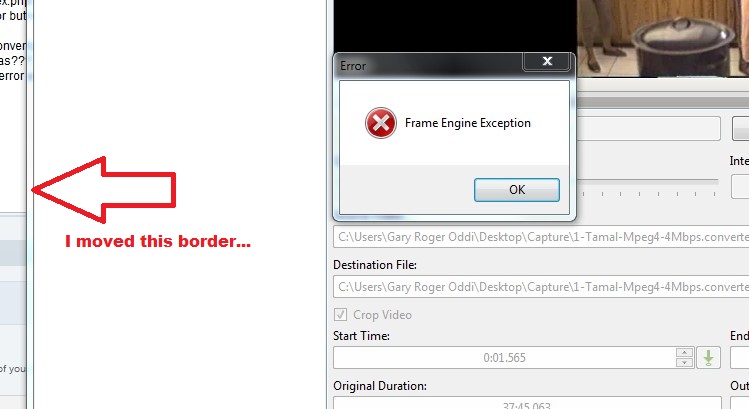
=============================== DG, errrr....nobeefstu, Yes, you are correct. I moved the VideoConverter program window. OK...I opened the VideoConverter in 7.06, by itself, and started a conversion. While it was converting, I moved the left side of the VideoConverter program's window to the right. The error occurred. So it is happening in the VideoConverter program, as you posted. Thanks for narrowing it down. Wonder if it can happen to others? I just happen to move the border to widen the cropping line. Gary -
Frame Engine Exception Error in 7.06 & 7.5Beta7
goddi replied to goddi's topic in General Discussion
========================= DG, I still have 7.06 and, I guess, never downloaded 7.07. But...since it originally happened in 7.5Beta7, I figure that it has not been 'cured' yet. The error message has occurred first in 7.5Beta7, and then in 7.06. Gary -
Frame Engine Exception Error in 7.06 & 7.5Beta7
goddi replied to goddi's topic in General Discussion
================= Could be, but the conversion process was finished and I was about to close the window. But I just tried moving the left border just to see what would happen, and I got the error again. Gary -
Greetings, I had received a Frame Exception Error in 7.5Beta7 and mentioned it this posting: http://www.picturest...7-bugs-75beta7/ I had also posted about an Assertion Error but nothing was resolved about the Frame Exception Error. I let it go because I thought it was just part of the Assertion Error problem. However, I was just doing a PTE Video Convert process in 7.06. And I got the same error. See attached. During the Convert process, I only moved the left border of the Convert window and the error popped up. Any ideas??? The conversion seemed to continue on to completion. And I noticed that even after the conversion was complete, and I moved the left border again of the Convert window, the error popped up again. Gary

-
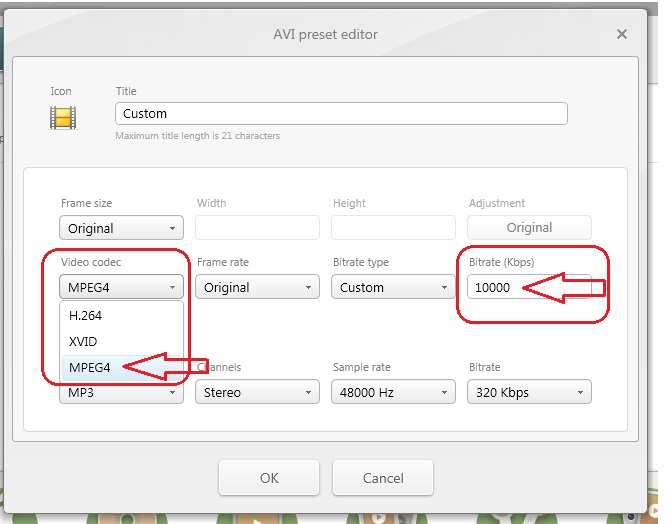
================================== Claudio, In addition to reducing the size of your still images, you have to be more concerned with the size of your video files if you want to make smaller exe files.'s Most people use PTE converter process which converts a video to an AVI file format that works well with PTE. However, many times, this process will create a file larger than the original video. In addition to trimming out the excess video portions, I prefer to have more control over the conversion process with the ability to reduce the original file size and still work well with PTE. I have been using Freemake Video Converter program, which is a free program: http://www.freemake....ideo_converter/ If you download this program (any many other programs), be sure to uncheck any extra programs they want give to you also, and usually, you don't want. What I like about this program is that I can choose not only the format, but I can choose the bitrate and the codec for the conversion process. After much testing and use of the Freemake program, I would suggest you try it out and select the AVI format, the MPEG4 codec and choose a lower bitrate. The MPEG4 codec will play better than the H.264 codec in PTE (at least that is what we have found so far). The bitrate seems to be the key to size of the video file. For example, if I start out with a 60Mb MOV video file that has a 20 Mbps bitrate, and I convert it using a 10 Mbps bitrate, you can cut the size of the video file about in half to about 30Mbs. The nice thing is that you can play around and try different bitrates. I have gone down to a bitrate of 7 and 5Mbps and the quality is still very acceptable. And of course, all this depends on what you are playing the final exe with. There are a lot of variables but give this a try. See the attached file. I hope this helps. Gary P.S. But I would always compare the results you get with Freemake with the results from the PTE conversion process.

-
===================== Greetings All, After poking around the Freemake site for a while, I just came across a page on their site that is entitled, "Reducing Video: When Size Does Matter:" http://www.freemake....ze-does-matter/ For those interested in taking more control over reducing the size of their video files, it is interesting. It makes the point about reducing the bitrate and using the H.264 video codec, things we have been kicking around in this post. Food for thought. Gary
-
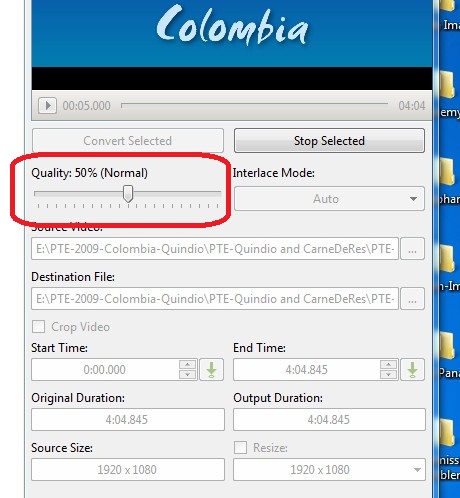
============================== Lin, I think we've beat this horse to death already. For me, the 'Quality' slider means nothing. Why not have a 'Advance' button to bring in any advanced features? At least with bitrate, you know what you have done and can learn what a good number is for your purposes and you are dealing with a known video factor. If you think setting the bitrate is 'dinking', that is what I feel when I am using the 'Quality' slider. I have not idea what it is doing. If setting the bitrate too low adversely affects the quality, at least you know why and you can gradually increase the bitrate with a better understanding of what is going on. You said to use the 'custom features' to manually modify the video. Where are these 'custom' features in the PTE conversion window? All I see is the 'Quality' slider. If PTE users are not concerned with the ultimate file size when they are inserting video, then you are right to stick with the 'Quality' slider. But...I think we need something to help bring down the file size and the only function that is easily available and eventually understandable is being able to adjust the bitrate. Just my 2 cents. I am pretty much in the dark about all this but I figured out what the affects are when adjusting the bitrate. Gary
-
============================ Lin, Thanks for the link. It helps me see that I am not the only one that thinks this is a 'black box'. There are a lot of factors working here that we can't nail down. But...it still leaves me with the question why PTE increased the size of the 77mb file so dramatically to 336mb during its conversion process. As you and the video link said, exceeding the 'source' bitrate does not generally improve quality. But I have found that reducing it without going too far retains quality and reduces the file size. Since there is no way to take into account all the other 'things' that are involved, I can only work with what I know and can control and that is the bitrate. All I am saying is, to me, the video's file size is important and the only control I seem to have in addition to trimming it, is to reduce the bitrate. I'd like PTE to have that functional choice in the conversion process. We would be able to fiddle with the bitrate until be see any reduction in quality, and let the 'CPU and GPU' do whatever it needs to do, because that we can't immediately factor in or tinker with. Gary
-
==================== Dave, No. What I am referring to is the 'Quality' setting that you can adjust for the PTE conversion process, see attached. I have no idea what it is doing. I'd like to have a Bitrate slider to help reduce the file size, if needed. Nobody seems to think that size matters, but when people start putting in video clips, from my experience, the only way to do it (besides actually trimming off portions of the video) is to reduce the bitrate. Otherwise, we are going to have gigantic sized slideshows. Gary
-
============================== Lin, Thanks for the info on bitrate. I will not challenge it because I have zero understanding of how the bitrate of an original video can be increased. I know it is done but it is way above my head. But then I wonder why video cameras shoot at such a high bitrate and therefore take up so much space when they could just take the video at a very low bitrate and have a process to increase the bitrate afterwards with no 'degrade' of the video. Just wondering.... But, I can not accept the fact that if a 77mb original video is put through the PTE converter, and it comes out to be 336 mb, that this is a good thing. I would like better controls on the output. It is sort of like when I want to compress a jpg, I want to be able to have a choice as to how much compression. Thanks... Gary