jevans
-
Posts
679 -
Joined
-
Last visited
Everything posted by jevans
-
Hi Lumenlux, Enjoyed you show very much. Great photos, Particularly liked the music which matched the show very well. You are asking the same questions as myself as to how to use Version 5 features to the best advantage. I am not sure that I am in favour of some of the very slick effects that some forum members are posting, even although am in awe of their technical expertise. My own thoughts are that the effects must be used very carefully to enhance a show and must form the key part. PZR should be used to bring something to a sequence which would otherwise be less interesting. I am not sure that you achieved this with your show. The zooms did not focus my attention on a particular part of an image. For example, suppose you had a photo of the inside of a church. At the end is the alter with parhaps an ususual alter piece. You show the whole scene and then zoom in to the alter piece. Another effect I have tried is a building with a clock. On the side of the building is a round plaque giving some information about the building. You show the whole building and then zoom out of the clock face the round information plaque. One of the other issues I am stuggling with is how to show text on the screen in conjunction with an associated image. Before Version 5, you might have just added the text in an appropriate part of the image and selected a colour which stood out from the background. Now with Version 5, you can add a small translucent image background for the text and then move the image to cover this when the text has been read. regards Jeff
-
Lin, What does occur to me seeing your demonstration and also following your description of how it was done, is that there could well be a need for a different type of tutorial. Whilst not in your league, I have been experimenting with a few short shows using Version 5 effects and have found it quite difficult to get the hang of adding multiple objects to a slide and setting their positions. The basic technique is straightforward of course, but when you have multiple objects, trying to keep track of where they are and where the will be eventually is not so easy. For a simple example, consider a title made up of separate letters. Initially they all have an opacity of zero so you cannot see them. Then they appear one at a time, until, at the end of the timeline, they are all the same size, level with each other, and make a word. Now to do this I found that the best way was to keep the opacity at 100% initially. Set each letter in its final position at the end of the timeline, then clone this keypoint for each letter, move the cloned keypoint to the beginning of the timeline, re-position the letter and set the opacity. Maybe that is obvious. But it took me a little while to work out. Perhaps you could do a short tutorial on how you actually add, position and adjust the various objects. Best regards Jeff
-
Al, I don't think that is the problem, but see comments below. Your comment made me look again at the problem and I think I have the answer. When locating zoomed images in the "objects" window, it seems to be important to use the "Auto" view first so that the locations are relative to the screen size. What I was doing was to have the window setting at 50% and thus the objects were not correctly located at the 100% setting. Anothe issue may be due to the fact that my default monitor setting is 1280 x 1024, an aspect ratio of 5/4. However my camera default images are 3264 x 2448 an aspect ratio of 4/3. So my practice has been to either leave them uncropped or crop them to 1280 x 960 (4/3) to get the best screen match. However I have been setting the "Project Options" "Screen" settings to 4/3 to match the images and not 5/4 to match the monitor. In fact, I realize now that this has nothing to do with the original problem but just alters where the images appear on the screen. So the answer is : when zooming and locating large images in the "Objects" window, always have the window view setting at either Auto or 100% while you are locating the objects. Thanks for setting me on the right track. Regards Jeff
-
Brilliant action. I worked through Lin Evans' cube tutorial and got it to work fine. But your action is very slick. Well done. Jeff
-
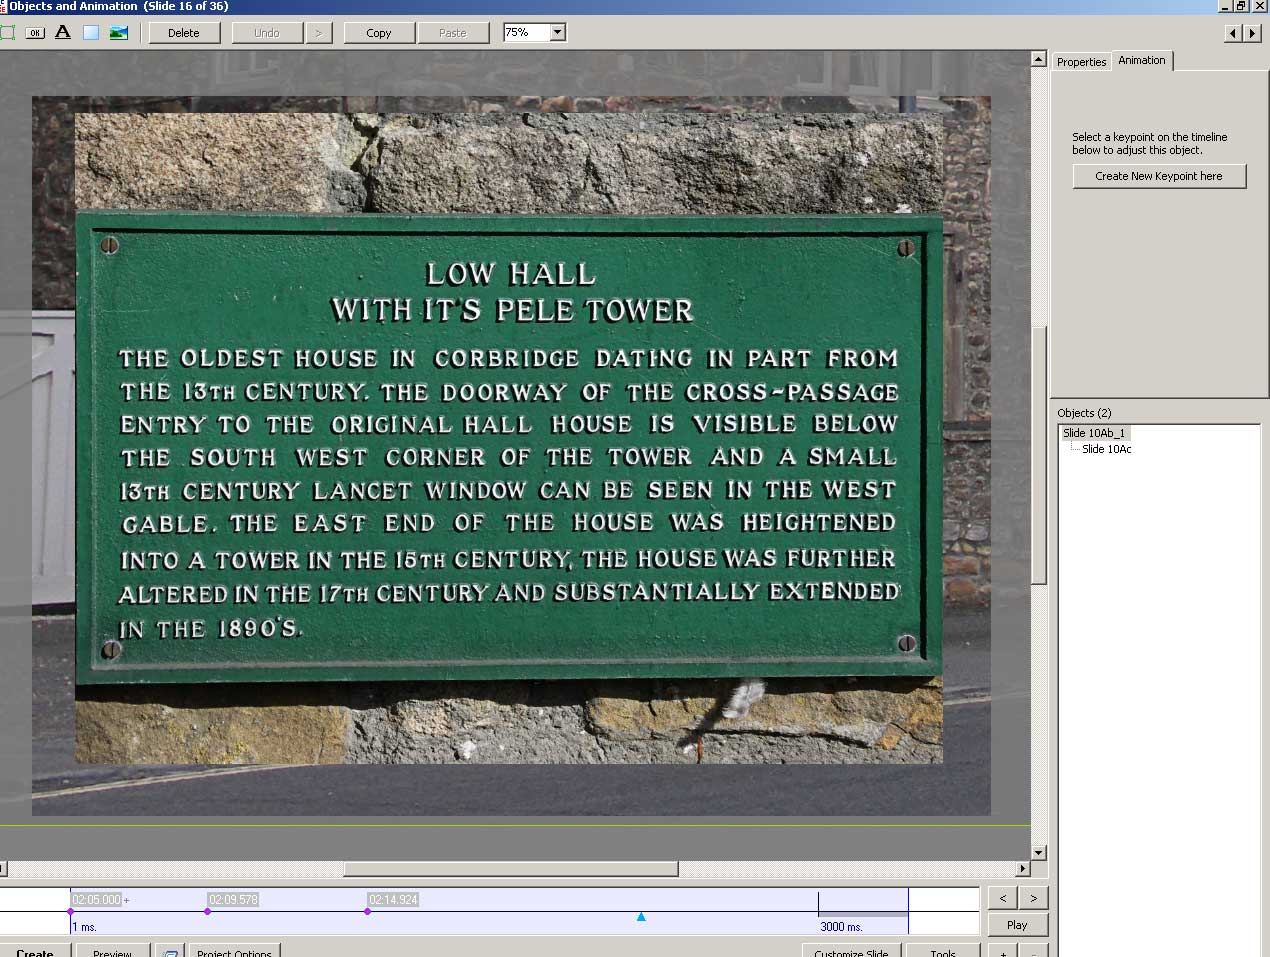
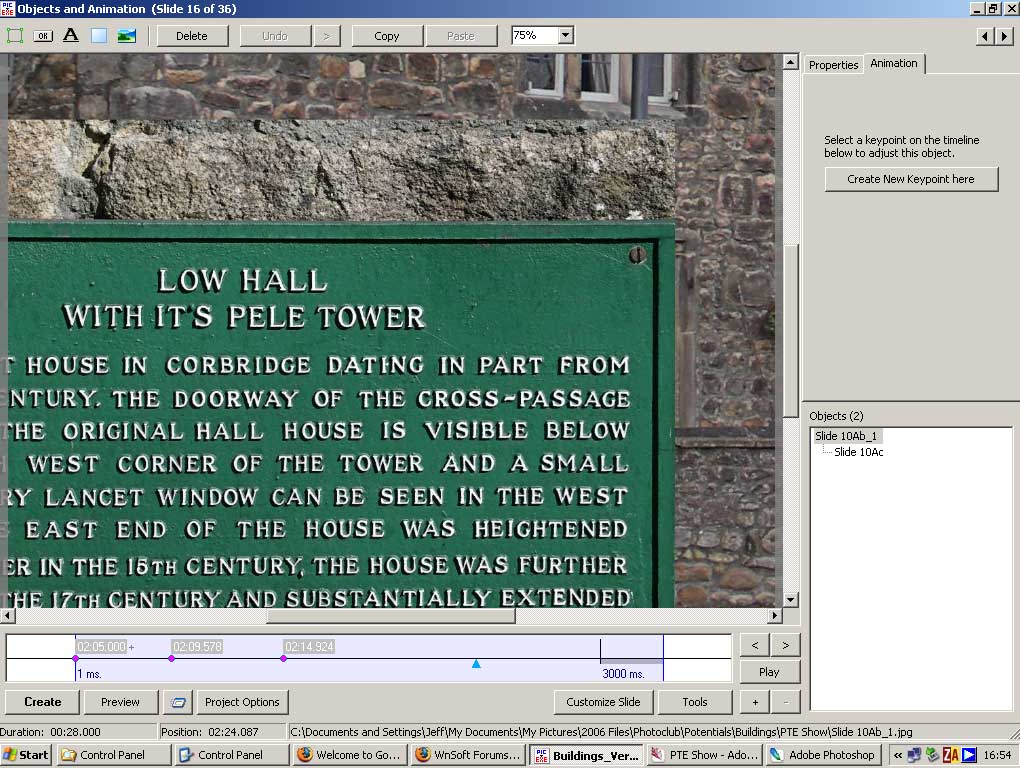
I have just prepared a short presentation using Version 5 Beta#5. My monitor is 1280 x 1024 and I set the screen options in "Project Options" "Screen" to 4/3. i.e an aspect ratio of 1.333 to 1 which is the same as my monitor. All the slide files are cropped to 1280 x 960 to keep the same aspect ratio. However I have one slide which I want to zoom in to. This is 3264 x 2448, i.e. the same aspect ratio. This slide is zoomed in to the bottom right hand side and then a second image is gardually expanded to fill the screen. On my monitor set at 1280 x 1024, this work fine and the second image expands to a central position on the screen. However if I view the same show on a pc with a monitor set to 1024 x 768, the second zoomed image is not central but offset so that it is not all visible. I attach two screen shots showing the two cases. I thought that Version 5 was supposed to overcome this problem of viewing shows on display units with different settings? Jeff
-
Just finished a short show using Beta #5. The problem seems to be caused by the music finishing just too early. Fortunatley using Adobe Audition, I can just extend the music track by a short amount without affecting the sound and then the music fits the slide timing exactly. Alternatively, adjust the slide timing so that the last slide just finishes before the music. Certainly the lack of music synch is a pain and I hope Igor deals with this in the next beta soon. Jeff
-
I am definately not an expert, but here are some comments which may help. Video codecs are generally installed on your computer as a result, either of installing particular programs which include in-built codecs, or by installing special codec packs. If you use the free software "AVIcodecs" which you can get here : http://avicodec.duby.info/ you will be able to see what codecs are available on your computer. Running AVIcodecs will show whether the ptecodec is available as it will show in the list of available codecs as ID - ptev. I think that this codec came as part of the original installation of PTE. Thus if you re-install a previous version of PTE, you may get the codec back again. Just a general point about installing both previous versions of PTe and the beat versions of Version 5. I have both installed on my computer in separate directories. However if I look at the list of installed programs using "Control panel" "Add/Remove Programs", I can only see the latest beta version and Version 4.48 is not shown. Jeff
-
Yes Al, it was me. I jusr mentioned that the order was the reverse of the "Layers" palette in Photoshop and Igor changed it to match. Jeff
-
Many times I have burned several DVD disks from a single source code using Nero 6. When rendering the DVD files (.IFO, .VBO, .BUP) using the temporary AVI file produced by PTE and importing this into Ulead Movie Factory, I DO NOT burn the vidoe files to a DVD disk immediately but create the files on my hard disk first. Then I use Nero 6 to burn the DVD disks. I do a project once a year for which I create a number of copies, all in the same burning run and I have never had any trouble. Seems as if Lin's reply is the most likely answer. Try just copying and old file to a DVD or CD and see if the burner is working. Jeff
-
I know that sound synchronisation is not yet implemented in Beta#4. However I have made a show with commentary and adjusted the commentary timing to line up with the relevant slides. In the timeline, you can see the slides lagging behind the commentary by about 2 secs. When I run the show on my computer at home, the sound/slide synchronisation is perfect. However when I run the same show on another desktop computer, the sound and slides gradually fall out of synchronisation as the show continues. Hope this is just a feature of the beta#4 not being fully developed at the moment. Jeff
-
Ron, I think that this may have been addressed before in the forum, but here goes for a description of what I am doing at the moment. My monitor is an LCD with a resolution of 1280 x 1024. I take all my digital pictures at an 8M setting, that is 3264 x 2448. If I am not using p/z/r effects, I crop the images to 1280 x 1024 (or sometimes 1280 x 960 to maintain the same aspect ratio as the camera). This is very similar to the process used by most people in previous version of PTE, mainly because : a) It is near to the resolution of 1204 x 768 which many digital projects use The reduced size image speeds up the processing during the show and it is better to pre-process the image in Photoshop than to get the digital project to do the processing. With Version 5, I now need to tak into account the image size required for p/z/r effects. Thus I am using the original image size of 3264 x 2448 and adjusting the zoom/pan settings to get the required effect. If I use a 1280 x 960 image for example, I can zoom in, but cannt pan or zoom out. Thus the image size used in a show depends on what you are going to do with it. Ken makes the point that you should use the largest image size and of course this is correct as it will give the most flexibility. However the downside is that it will require more processing and hence a better graphics card spec. Regards Jeff
-
Hi Lin, Great idea. Like Ron, at first sight I could not see what you were getting at but it soon becomes obvious. I think I was expecting some clouds or thunder etc. I still have some reservations about how these new effects, possible in Version 5, might be used to enhance standard shows. I am just about finished my first one using Betas #4 and find that it is much more time-consuming than before. If you are trying to produce an "artistic type" show, then the possibilities are endless. But otherwise the addition of too much movement or fancy tricks may detract from the basic photos.
-
JJR, Yes I have tried using the Sound Line. That is the way I initially tried. It is quite good for short bits of commentary that are associated with one or two adjacent slides. However I prefer to use a sound editor. The reasons are mainly : a) I have the whole commentary assembled in one place and can then easily match the music as a last step. Audition gives me the possibility to modify both sound levels and apply filters at any stage. Thus I can modify the sound track whenevr I like to get the best results. If you have not got Audition, Audacity (which is free) will do a very good job but it is not quite so flexible or comprehensive. Jeff
-
Ron, Very nice pictures and music. Particularly enjoyed the choir. Picking appropriate music is one of the hardest things to do. Just a very minor point - your pictures are on screen just a little too long for me. I usualy go for 7 secs with a 2-3 sec fade. Obviously if there is commentary, then a slide might be on for longer. Jeff John, Great photography and a very pleasant AV. If the intention was to investigate the features of Version 5 then you have succeeded very well. But I think your AV illustrates for me that the p/z/r features can be overdone. Maybe this is ok for what I call an "effects" AV where there is no story, just good images. However I think for AV's that have a theme or story, the p/z/r effects have to be used with caution. Jeff
-
Ron, See my post above, part of which I repeat here : "I use Audition and prepare all the sound here and then attach the resultant composite file to the PTE presentation. The way I do it is to first select and sort the slides. Then prepare and write the commentary based on the selected slides. Then I record each item of commentary into Audition and, at the same time in the PTE timeline view, insert the relevant slide. Finally I add the music and tailor this to each section of the presentation. This technique will not work in PTE version 5 at the moment." The first thing is to have a list of all the slides in the show and mark up the ones with commentary. Then I open the PTE timeline window with a blank sound file and gradually add the slides one at a time. If a slide has no commentary it is just added to the timeline. If it has commentary, then I record the commentary in Audition and match the slide insertion time to the commentary. Finalyy when all the commentary is recorded, I replace the blank sound file with the composit commentary file and test the show. Some positionlal adjustments may be necessary. Finally I add the music in Audition and match it to the commentary. Easy really !!! Jeff
-
Hi Ron, Thanks for your comments. Regarding vertical images, I have still not found a completely satisfactory way of dealing with these and also the panoramic views. I have tried a number of different techniques including the use of masks and frames. But I can never decide which is best. There seems to be a great variety of views in our club about this and no common consensus view. I suppose everyone has their own favourite method. Regarding the use of Version 5, I suppose you are right. It may have been possible to synch music and commentary by fiddling about in the sound editor. I use Audition and prepare all the sound here and then attach the resultant composite file to the PTE presentation. The way I do it is to first select and sort the slides. Then prepare and write the commentary based on the selected slides. Then I record each item of commentary into Audition and, at the same time in the PTE timeline view, insert the relevant slide. Finally I add the music and tailor this to each section of the presentation. This technique will not work in PTE version 5 at the moment. Whilst being as excited as the rest of the forum about the possibilities of Version 5, I am a little concerned that the facilities and techniques it will provide might become an end in themselves and detract from the overall show. The main issues for me are : a) that the images are of high quality and show something interesting that the show should tell an interesting story or present unusual images At the moment I can achieve all this in the current PTE version. When Version 5 comes out I think I might just use a limited range of facilities unless I can see that a particular effect greatley enhances the end result. For example I have a current project on the go about sundials and have been experimenting with an opening shot showing the sun travelling across the sky and the resultant shadow effect on a sundial. Regards Jeff
-
Hi Lin, Thanks for comments. I like to have a bit of commentary with background to my shows to make them more interesting than just a series of images. I would have like to have some "port entering" images, but entering the first harbour was difficult, and with a brand new boat, the owner wants you to be concentrating on waht you are doing, not sloping off taking photos. The second harbour had too much large ferry traffic for us so we anchored outside and used the inflatable to get ashore. Hence the photo of us landing. Regards Jeff
-
I have recently returned from a 12 day voyage, bringing a brand new yacht back from La Rochelle in France to Jersey, its home base. On the way we called in at two beautiful Breton islands and this show is the result of these visits. The show is posted on Beechbrook and is entitled "French Islands" http://www.beechbrook.com/pte/index.asp I used PTE Version 4.48, (although I would have liked to use Version 5) as I like to have some commentary in my slide shows and the new Version 5 is not yet available with sound and picture synchronisation. Would be interested to hear if anyone thinks there is too much commentary. The amount of commentary in a show has been a topic of some debate in my local photographic club. Jeff
-
Hi Lin, Yes of course I agree with you. Just wanting to try to curb too much enthusiasm for new features. I was once involved in the design of a major software suite for which there was a detailed specification prepared initially with consultatation with the intended end users We made the mistake of releasing a number of beta versions and the users bombarded us with requests for changes/new features which were in the "desirable" but "not essential" category. Regards Jeff
-
To Members of the Forum, I like all forum members, eagerly await the next beta version and, hopefully in the near future, the final Version 5 PTE. However Igor's task appears to be a difficult and complex one judging by the time it is taking to reach a fully useable Beta version. Although I note and greatly admire the efforts and expertise of forum members in seeking out faults and suugesting improvements, I wonder whether the number of requests for additional or modified features might not be distracting Igor from the fundamental task of acheiving a fully working Beta version. As someone who was involved with software design when I was working, I know how sotware design is never finished. There is always just one more tweak that seems to be so desirable. Remember the old saying, "the camel is a horse designed by a committee". So this is just a plea to let Igor finish his current work before considering any further "improvements or additions". There will be so much to explore when we get the next Beta version and plenty of opportunity to explore improvements. I am sure, like me, you all have projects on hold waiting for the availability of the finished Version 5.
-
Deanna, There is no quick easy answer to your question. But I will try to give you some ideas. Firstly create an avi file from your PTE show. Just use the standard default settings for "DVD video disk, but uncheck the box against Ulead Movie Factory if you are not using that program. The file you create is a temporary file and must be imported into either Ulead Movie Factory or Nero Vision Express. Then the resultant file is burned to a DVD from either of these programs. Both Movie factory and Nero Vision Express have settings which allow you to alter the quality of the resultant video. If you tell me which program you are using, then I will point you to the place to alter the settings. Jeff
-
Ron, Open Word. Open the basic "normal.dot" template file which you will probably find in C:\program files\microsoft office\templates. Go to Tools - Language - set language. You will probably find that both the USA and UK English versions are ticked. Select (i.e. highlight) the UK English version and click on the "default" button. Then save the file. This will creat a new version of the standard template with the language set to UK English. All subsequent documents will have this as the default. Jeff
-
Ron, I will volunteer. However I am in Germany at present. Back in UK on 4th July then away again from 13th to 24th July. So will not necessarily be very quick in answering. Jeff
-
If you want to pan an object across the screen or zoom in to an object, it is obviously better to have the object size greater than the screen size. I think there has already been some discussion on this in the thread on Version 4 Beta#2. So yes the file sizes will go up if you use these features. Not sure what you mean by "panorama being only proportionally larger", since it is likely to be a larger file than a standard image. See comment above regarding PZR actions. Yes, my understanding is that you will be able to use Version 5 in just the same way as Version 4.48 and not use the PZR faciltites if you do not want to. Again I think Igor has referred to this in previous postings. In the new Bet#3, adding objects into the editor results in them being added with their original file name. So added objects are automatically given a label. The objects are listed from the top, in order of their addition (initially), with the top object being at the back. Unfortunately this is the reverse of "Layers" in PS but you soon get used to it. The order of these objects can be manually changed to meet user requirements, just like "Layers" in Photoshop. It is probably more informative to have the "layered" objects named rather than represented graphically and is also probably more processor efficient than using graphical objects Jeff
-
I have a question about Keypoints. I have a slide of about 120 secs on which I want to add about 30 images, each with its own PZR effects. The keypoints for each object are vary close together and it is difficult to select a keypoint to adjust it because you can only select a keypoint by clicking on the time label. How has anyone else tackled this problem ? Would it be better to use the keypoint time box to show the actual keypoint time, instead of having a large label, and using the red dots to adjust each keypoint? Jeff