alrobin
-
Posts
3,395 -
Joined
-
Last visited
Everything posted by alrobin
-
Ben, See John's "Autumn Demo" which I believe is available on Dom's site.
-
Bob, Sorry, I couldn't tell you if it's available or not in PS Elements. Yes, you can "save to web" in batch mode - it's called "export". (see attached action). The advantages of "save for web" are: 1- you don't have to flatten multi-layer PS files, and 2- the extra information about the image is stripped off, thus saving a small amount of file size (not really significant, compared to 1024x768 size images - maybe 5 or 6 kb on 200 kb). If you choose "save-as (optimised)", you accomplish the same thing. Image quality is virtually the same.
-
I don't see a tutorial - just a plea for help and a note saying the website is coming soon. ??
-
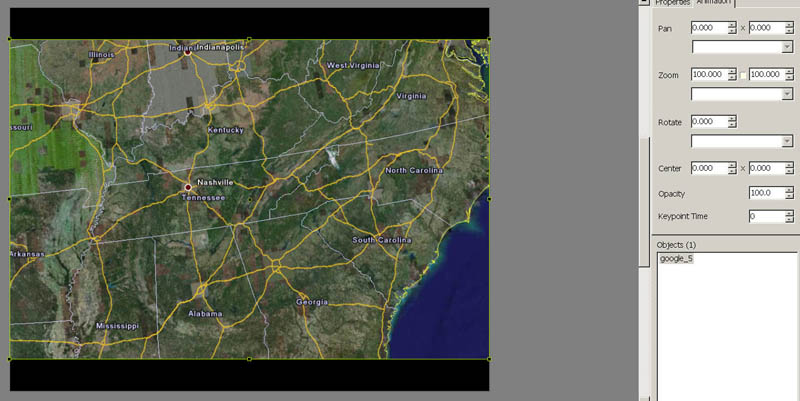
Dave, I presume you mean "Fit to slide". ("Fit to screen" is another option in Project Options which I don't think is activated yet in v.5.) "Fit to slide" means "adjust whichever dimension is necessary, either height or width, in order to obtain the maximum image size on screen without cropping the image or distorting the aspect ratio". In your example the image will be resized until its width matches the width of the screen. If it were a 2:3 image, then the heights would be fitted. I don't quite understand your concern. I created the example you quoted, set the aspect ratio to 5:4 in Proj Ops / Screen, and the attached is a screen cap of the settings in O&A. The zoom percentage clearly shows 100% as it should. When this example is played on a 5:4 monitor, the widths should match up (I can't try it out because my monitor is wide-screen). Please explain further if I've misunderstood you.
-
I see this a little differently - if an image in an AV has to be cropped, I like to have total control on where it will be sliced. Therefore, I rarely, if not never, use "cover slide" mode. I am not against providing a global cover screen option in Proj Ops, which one could choose if one wished to apply this mode to all images, but I would not be in favour of making it the default. For my own purposes, "Fit to screen" is the best compromise for v.5 as I usually use images large enough to be able to provide a sharp high resolution result even when resized on wide-screen high-res monitors. "Cover slide" mode results in arbitrary cropping with some monitor resolutions, a condition which I, personally, cannot accept.
-
Congratulations to both Rons! Ronwil for your 1000th post, and Ronnie for your birthday. Ronnie, you and I are almost exactly the same age, but not nearly as old as Ronwil! Here's wishing both of you many more to come (both posts and years)!
-
Bob, If all your images are the same size to start with, you can batch crop to a specific size and portion of your image in PS.
-
Gerdi, Igor is not motivated by money. And he doesn't drink vodka. You could maybe buy him a gift certificate to a nice Russian spa!! But I doubt if even this would make him change his priorities for PTE!
-
No, every slide has one keypoint by default, but it needs at least 2 in order to have a change in effect applied (e.g. PZR movement). However, you can set values for the single keypoint, which simply moves the image over or rotates it, etc., at the beginning.
-

Version 4.48 versus version 5 beta - pan/zoom
alrobin replied to garic's topic in General Discussion
Garic, Welcome to the Forum! Like everything else in computers, the answer depends on how extensively you plan to use the PZR effects, the size of the images, how many and how "close" together they are, etc. All of these take up computer resources, and as you know, these are more limited on some people's computers than on others. V.5 will operate quite well on most pc's with Win XP and DirectX ver. 9c (comes as part of Win XP's SP2 upgrade), and a video card with a minimum of 64 Mb VRAM (128 Mb recommended). However, if some of your clients do not have this minimum, and/or if you plan on many effects happening at the same time, then you would be best either converting to DVD, or creating a special show in version 4.48. Igor has promised that the final release of v.5 will have the ability to detect whether or not a pc has the necessary resources, and if not, to switch to v.4 (without the ability to run PZR effects, of course). -
Yes, you can. But you have to copy the "objects", themselves. In O&A, highlight the objects, in the objects list, whose keypoints you want, and select "Copy" at the top of the window. Then open O&A for another slide in the same show, and hit "Paste" where you want the objects to appear in the objects list for this slide. You can copy keypoints from one show to another, but to do so you have to copy the entire slide. See Hawk's excellent description, already mentioned by Ken above: http://www.picturestoexe.com/forums/index....amp;#entry31206 When you open O&A for a slide, you automatically have one keypoint (at the beginning of the slide). To make the image move, you have to have at least one other keypoint, which you create by highlighting the small keypoint rectangle on the timeline and hitting the "+" button. You can then move this keypoint to wherever on the timeline you want it to appear. So far, nothing will move when you "scrub" the timeline by clicking on the little blue triangle and dragging it along the timeline. To add movement, you must change the PZR parameters for one of these keypoints, so that one is different from the other. This is what sets up the motion. You can add as many keypoints as you wish, in order to obtain changes in this motion, or you can also add other images or "rectangles" as objects, and create effects with these objects, too. Try experimenting with this until you feel comfortable with all the possibilities.
-
Peter, Maybe I'm not understanding what you are trying to do. There are two ways to repeat a set of keypoints: 1. Highlight all objects in the object list, and use copy and paste to duplicate them. Then move the new ones to where you want them. You can use the detailed numerical values under the "Animation" tab to help set up the parameters to repeat the same effect as the originals. 2. Make a short show with two slides, and select "Repeat show until Esc is pressed" in Project Options. Does this help you accomplish your objective?
-
Hi, Keith, I didn't mean to imply that you and Ken were at odds - from what I could tell, you are both very amenable characters. Don't ever call up Ken and tell him you are a telemarketer, though! Lin's advice re the rewritable DVD's is very good - I have been using them while extensively testing the new betas, and only made 2 "coasters", before I ended up buying a bunch of RW's. These have worked fine for me since. Re the cropping, the shows shouldn't appear cropped, unless, possibly, if you were using the "Cover slide" mode in PTE "O&A / Properties". You should have black bars on each side instead. Check to ensure that you have the aspect ratio set correctly for both the PTE project file and Video Builder. If set OK, and the problem still persists, then Igor would have to resolve the problem for you as he did for me when I was trying to get a 16:9 show to play properly on a 4:3 TV set. Re the loss in sharpness, it is a fact of life that you will lose some definition in video mode, compared to the images alone (or in a PTE show), viewed on your pc. You have to use very expensive hardware and codecs in order to achieve the quality of a commercial movie DVD. With amateur equipment, everything is a compromise. But, I am surprised at how good our attempts at videos do appear when played back through a DVD player and a good-quality TV set or projector.
-
Peter, Welcome to the Forum! Next time, make a note of the parameters for each keypoint (you can read them off of the "O&A / Animation" tab), and you will be able to duplicate the effect by simply adding the objects in the order as before, adding the necessary number of keypoints, and and then typing the numbers back in the appropriate input boxes for each keypoint. It would be simpler to save the pte project file as a "template" and then copy each slide over to the new show, but if you lost the original, this obviously would not be possible.
-
Hi, Keith, Sure, I remember you - you were there with Brendan (sp?), (and Alan & Phil). But I didn't realize it was you on the Forum until now. Good to "talk" to you again! By the way, Ken taught me everything I know about creating DVD's! Happy New Year, and all the best with PTE!
-
Keith, Ken has directed you to some excellent discussion of how to convert version 4 shows to video. Version 5, beta 8r, has taken much of the guess-work out of the process, however, and simplified it considerably. While there is a lot of discussion on this procedure in the video section, and the pinned thread for the new beta version of PTE, basically the main steps are as follows: Assume you are burning an AV composed of images of resolution 1024x768 px, and want the show to be viewed on a regular 4:3 aspect-ratio TV set (via a DVD player). 1. Set up your sequence in PTE version 5. (You don't have to create it as an "exe" file). Note that this procedure will not work with slideshows built with older-versions of PTE 2. In Project Options / Screen, select aspect ratio 4:3 3. Save the AV sequence (as a ".pte" file). 4. Select "Video" at the bottom of the main PTE window. This will open a menu with two options. Select "Create DVD disc". This will open a separate program called "Video Builder". 5. Browse through the panel on the top left to where you saved the ".pte" project file and click on the appropriate folder. 6. Click on the project file where it appears in the window on the right, and select "Add" at the bottom of the window. An icon for your file should now appear on the horizontal frame at the bottom of the screen. If you want to add additional PTE project files you can do so at this point. 7. Open Project options and make the following selections (leave everything else as is): -- TV system: select NTSC if in North America, and PAL nearly everywhere else. -- Menu aspect ratio: 4:3 -- Titles aspect ratio: Auto -- Advanced options: Select "Return to menu ..", "Add chapters ...", and "Animated menu" (if you want a fancy movie-type menu on the DVD). 8. Click "OK". 9. Click "Next" (bottom of the main window). This will open a colourful "Menus" window where you can select the background you want (in the vertical bar on the left hand side). You can move things around, resize the titles by clicking and dragging the corners, right-click on the various titles and objects shown to make changes, etc., etc. Or, you can leave everything as is and go on to the next step. 10. Assign a project name, and check off the options you want - for now, if you just want to burn a DVD, just select this option, and leave the others unchecked. You can experiment with the other options later. 11. Insert a DVD in the burner, and click on "Start". You will see a "log" of your progress as the various video files are rendered, and the burning process starts. The time taken will be roughly proportional to the time for your AV production and the size of the image and audio files. Hope this helps some - please don't hesitate to post again if you run into snags along the way. Best of luck!
-
No, the "user controls" such as mouse action, nav-bar, etc., are not activated yet in v.5.
-
Ron, It probably stems from singing the "Messiah" too much this Christmas season! All the best to you in the New Year too! JP, I agree with what you are saying, too, that image size is also significant - it's always been that way with PTE, and always will be, as there must be more to process with a large image than with a smaller one. It's interesting that screen size is more important, though. I wouldn't have suspected that.
-
Stan, The inability to "program" the mouse to "exit" in version 5, or to use the nav bar, is only temporary - it will probably be reinstated in beta 9.
-
My findings seem to reflect this too. As I've pointed out to a couple of people on the forum who, like me, have been having problems with "twitches" at the start and end of transitions, reducing the monitor resolution seems to help. I'm using a "middle-age" Radeon 9600 card with 128 Mb of VRAM, and find that when I reduce the monitor resolution from it's native 1680x1050 to 1280x768, the glitches virtually disappear. I say "virtually" because I think I can still detect a slight hesitation - but it could be because I'm expecting it, so seem to see it.
-
Hi, Nickolas Welcome to the forum! Thanks for all your hard work on the program - programming people like you make life for people like us much more enjoyable and more artistically productive! Which program do you work on - PTE or Video Builder? Hope to hear from you again, and hope you have a Happy New Year!
-
Gerdi, I experience the same effects when I try to run a complex v.5 show with my monitor resolution set too high. Try setting it to 1024x768 (or 1280x768 if you have a widescreen monitor).
-
That would be great, Igor! Thanks!
-
Squeaky, Welcome to the Forum! Bruce's information is correct. Unfortunately you can't hear the over-dubbed sound in the main timeline preview - only using the "preview" button as Bruce described.
-
John, It is my understanding that Igor will provide the full capability of v.4 along with v.5 when it is released. This is not the case now - it will play until replaced by sound or music on a following slide, regardless of the slide duration. This is the way it works now in v.4. But music over-dubbed using the "sound comment" line in the main window will only play for the duration of the slide unless "Don't interrupt sound comment when next slide appears" is checked in ProjOps/Music. Customize slide audio will NOT play over Project Options audio - if you want sound to play over Proj Ops audio, you have to use the "sound comment" line.