davegee
-
Posts
9,295 -
Joined
-
Days Won
56
Everything posted by davegee
-
Where are you when you are trying to add a blank slide? I can't find a situation where it is greyed out! If you have a slide highlighted it will put a blank slide in front. If you have nothing highlighted it will put a blank slide after the last slide. In a new project it puts a new blank slide in. DG
-
Thanks Barry, I WILL try that as an alternative to Print Screen in case this happens again. Just to re-itterate, I was happily creating screen grabs yesterday morning (see here) when suddenly I was unable to create a Screen Grab from the O&A screen when an object was selected. I was trying to show Shep the Properties Tab in O&A when performing a routine. The effect was like Photoshop telling me - there is nothing in your clipboard to paste. If I deselected the object I was able to Print Screen - I did this numerous times before giving up - Object selected - No Print Screen - All objects deselected - Print Screen OK. I tried shutting PS down and starting again but the effect was the same. I began to wonder if I had ever done this before when objects were selected in O&A. After being out most of the day and my (Vista) laptop shut down, I decided to try it again last evening and after what was effectively a re-boot, I couldn't make it fail! My laptop had got into a state where it would Print Screen as long as no objects were selected. I even tried to do a Print Screen within PS when Select All was active and failed - remove the selection - hey presto, Print Screen returned. If anyone else has experienced this I'd be glad to hear from them but, at present, it's an intermittent problem that I can't repeat. DG
-
What Dave was describing was the "Transparent to Selection" button in the O&A / Common Tab! DG
-
I must have been having a bad morning!! I have done this HUNDRED's of times but could not remember whether I had done it with something selected in O&A. Whatever was stopping me copying and pasting this morning has righted itself. Weird!! DG
-
It seems to be impossible to do a Print Screen and Paste into Photoshop....... .....IF there is something selected on the screen e.g Select All in Photoshop or an Object in O&A. It's probably a Windows thing. Is there a way around this? (Or am I doing something wrong?) DG
-
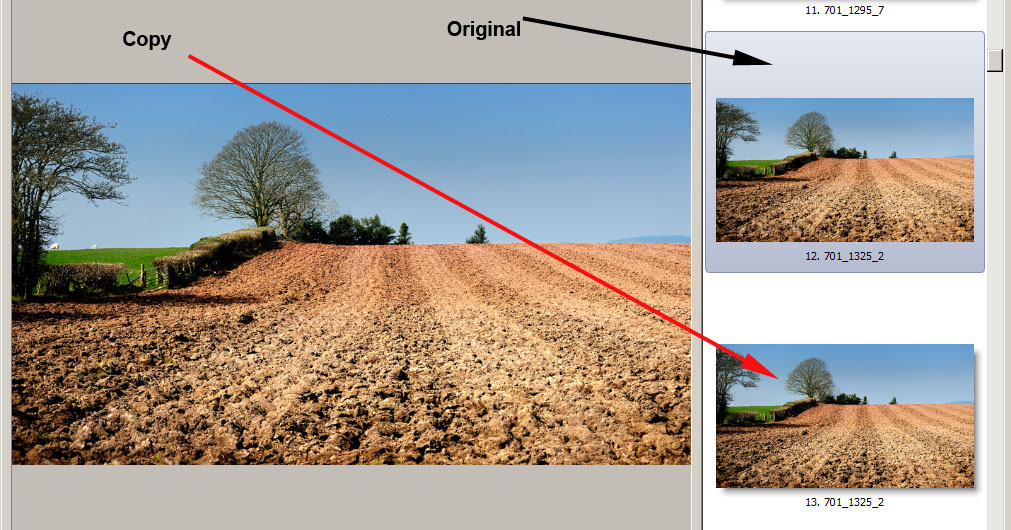
See examples below: Copy the original and paste below it. THEN go to O&A and select the COPY and the Keyframes are there as per the original. In O&A select Properties and make sure that you have the image HIGHLIGHTED (Click on it or the name in the object list). You will then be able to change the original image for your new image and the keyframes will not alter. DG
-
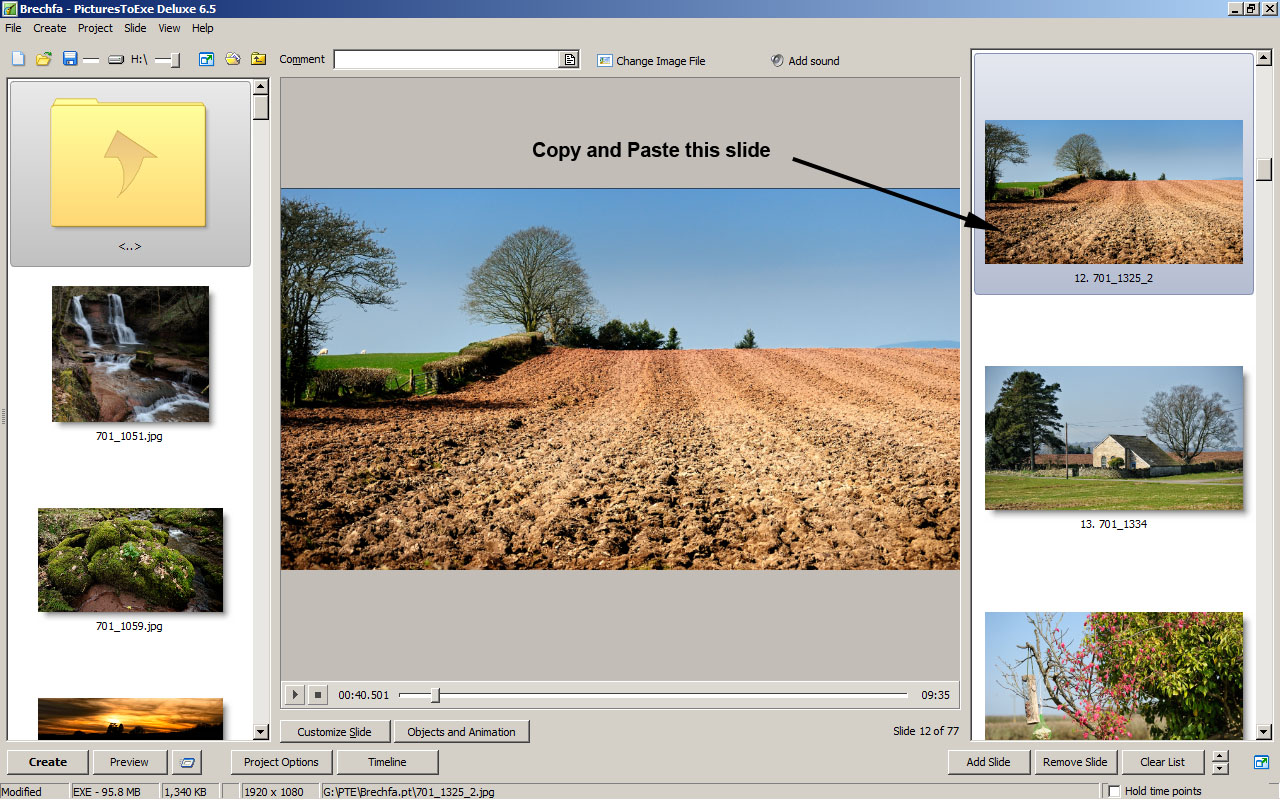
It is far easier to copy the whole slide (with its keyframes) in the Slide List and change the Image in the O&A/Properties/Picture box. DG
-
No problem Laurence. DG
-
Laurence were you replying to me? DG
-
Right click on a suitable slide and COPY. PASTE after the last slide and go to O&A / Properties Tab. In the PICTURE box change the IMAGE in the slide to the new image that you want to zoom into. The new image in the copied slide will now have the exact same properties as the original image in the original slide. Usual rules apply - make sure that you have ALL images, music files etc in ONE folder per project. DG
-
If you think of all of your O&A images (objects) as layers then it is difficult to select the bottom image / layer with your mouse. Making the upper layers transparent to selection makes it easy to select a lower level image and move it around using the mouse. DG
-
Add the PNG as an Object in Objects and Animations. Right click on the PNG's first keyframe and clone the keyframe (twice) adjust their positions to where you want them. Change the OPACITY of the third keyframe to ZERO in the ANIMATION tab. The PNG will then fade out between keyframes 2 and 3. DG
-
Peter, Because the PTE file is (usually) so small it might be a good idea to save a new version each time that a new session (on the same project) is started appending a-z etc. That way (using Auto Save) the user would end up with a way back to the beginning of the project (if necessary) or at least to a previous version. It takes a bit of discipline but it would work. DG
-
Thanks Igor. DG
-
If I already installed 6.5.4 BETA do I need to install this version???? DG
-
Mark, It is a manual operation. Create the folder and transfer all files to it. This assumes that you were following normal good practise for PTE which is described above. ALL images music etc should be in the SAME dedicated folder per show. If you weren't doing this you might have a lot of trawling to do. DG
-
OBJECTS and ANIMATIONS. DG
-
In O&A click on properties and you'll see "picture" with a box show where PTE is looking for the picture. Create a folder with exactly the same file structure and put the image(s) in that folder. That way PTE will find the image(s) and you won't see a blue error message. That's one way - there might be others. Next time you "flatten" your laptop create some Templates beforehand? There's more info on that on the forum. DG
-
Easy enough to prove. Make a show at 3840x2160 and add a full res jpg SOC in cover slide mode. The "overlap" is at the top and bottom but you still get black lines T&B when shown on a 16x10 1920x1200. Fullscreen and Windowed Mode give same result. The AR of the show is "best fitted" to the AR of the monitor it is being shown on. DG
-
By converting it to Flash or similar. Go to Ron West's web site - he does some tutes on this. DG
-
I will need to think about this. I thought that the "Cover Slide" refered to the relationship between the image and its parent AR? That show's AR would then be "best fit" to the monitor on which it is shown and if not a perfect match black lines will be the result. DG
-
Barry, I'm intrigued. How is it done? DG
-
I will be in the same boat when, at some stage, I will need to upgrade to a new desktop with W7 etc. I have always had nVidia with 512Mb memory and would be loath to have to make the change. Watching with interest. DG
-
Downloaded and installed OK. Thanks Igor. DG
-
What the OP is asking is impossible because not all computer monitors are the same resolution and (more importantly) aspect ratio. The best "compromise" is to make a show at the aspect ratio of your own monitor and at a resolution which will fit to either the height or width of any monitor it is likely to encounter. Common sense dictates that there must be an upper limit to this and I would suggest that, depending on your own screen AR, the height need not exceed 1200 and the width 1920. An example or three: If your monitor is 1280x1024 (5:4) and your shows are made to fit to screen with images 1200 high your show will fit ANY monitor up to 1920x1200. If your monitor is 1920x1080 (16:9) and your shows are made to fit to screen with images 1200 high your show will fit (the width of) ANY monitor up to 1920x1200. If your monitor is 1024x768 (4:3) and your shows are made to fit to screen with images 1200 high your show will fit ANY monitor up to 1920x1200. In PROJECT OPTIONS/SCREEN set the aspect ratio to suit your monitor and the resolution to xxxx by 1200. Remember to tick Fixed Size of Slide in Pixels. Black lines in some circumstances (top and bottom OR at the sides) are, I'm afraid, an occupational hazzard. DG