davegee
-
Posts
9,295 -
Joined
-
Days Won
56
Everything posted by davegee
-
In GeForce Experience it is possible to start the Capture (F9) and then Start the EXE. When the EXE is finished press F9 again to finish the Capture. Record at the Highest possible quality. The resulting mp4 can be dragged into PTE and trimmed to suit before saving/outputting as a PTE mp4. DG
-
nVidia GeForce is also free and does a great job. As well as being able to screen record it keeps your drivers up to date. Highly recommended. DG
-
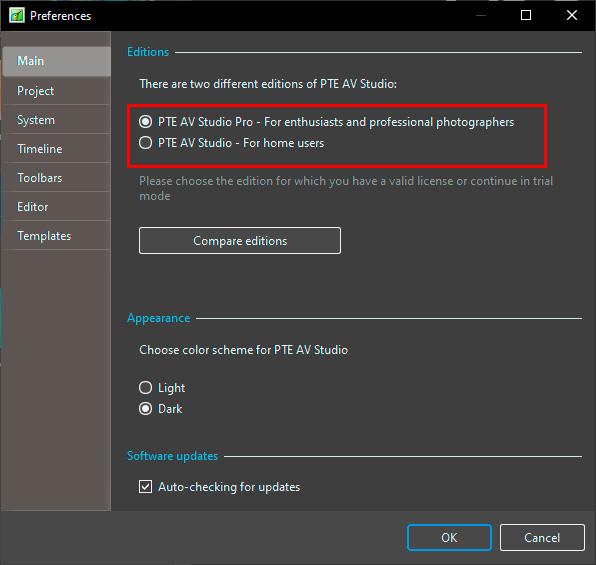
Please use ENGLISH - Google Translate. "I wanted to update the PTE AV STUDIO 10 PRO version to PTE AVSTUDIO 11 PRO. I paid 48 euros, but the key sent to me must correspond to version 11 simple because it does not work!!!!! I feel like I'm not understood. What to do ?" Are you getting any error messages? Have you installed version 11 from here https://www.pteavstudio.com/forums/topic/34835-pte-av-studio-11011/ If you go to Settings / Preferences / Main, does it show "Studio Pro" or "Studio"? DG
-
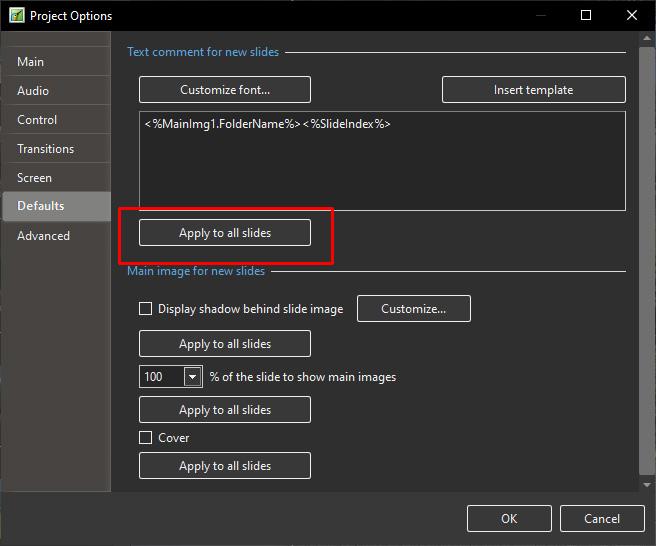
The Style shows a method of Stroking Text in PTE AV Studio. Apply the Style to a Blank Slide and Change the text to your requirements in BOTH versions of the resulting Text Objects. Suggestion: If the Slide to which you wish to add Stroked Text already contains an Image or has Animation, add the Style to a Blank Slide and Copy and Paste the FRAME into your Slide. Adjust Size and Position using the Frame. When changing the Font the changes must be applied to BOTH Text Objects. Stroked Text.ptestyle DG https://docs.pteavstudio.com/en-us/11.0/how_to_v11/stroke
- 1 reply
-
- 5
-

-

-
See the last two posts here. https://www.pteavstudio.com/forums/topic/38631-zip-file/#comment-176588 DG
-

Oriental wording in the interface on Mac [SOLVED]
davegee replied to Teresa's topic in Troubleshooting
DG -
P.S. I just remembered that a Style does not include the colour of the background of a slide which was in my case RED, to be able to distinguish between the inside and outside borders. Apologies - just change the BG colour? DG
-
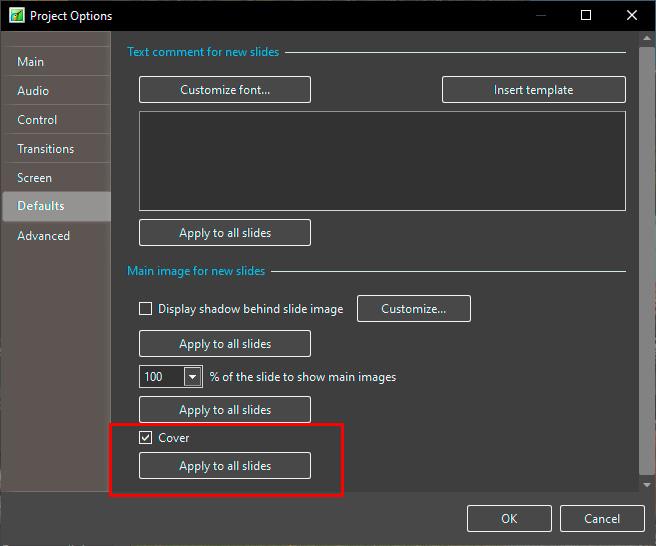
Here's a reminder of the method of applying Borders Inside of an Image within PTE and without changing the Aspect Ratio of the Image. 1. Apply your border and determine the width that you require (in pixels). 2. In "Image Crop" apply the same value to each of the Top, Bottom, Left and Right of the Image. 3. If you decide to change the Border Width remember to change the value in the Image Crop settings. Drag an image into the Slide list (16:9 Project) and apply the following Style. Examine the resulting four slides in O&A and observe the settings in the Properties and Animation Tabs. Borders.ptestyle DG
- 1 reply
-
- 2
-
-
-
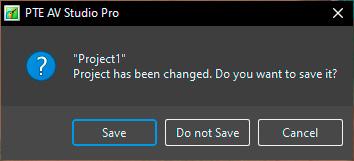
Hi Ken, This is probably not the answer you want but if you click on "Do not save" it does not alter the time stamp. DG
-
All replies should be in English. Please use Google Translate. DG
-
You can upgrade. It is worth the price. Compare the editions. DG
-
Hi Brian, Which version did you purchase - PTE AV Studio or PTE AV Studio PRO? The Envelope Tool Keypoints feature is not available in the PTE AV Studio version - you need the PRO Version for that. Compare Editions - see the AUDIO section: https://www.wnsoft.com/en/pte-av-studio/compare/ DG

-
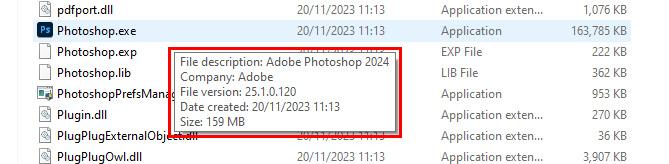
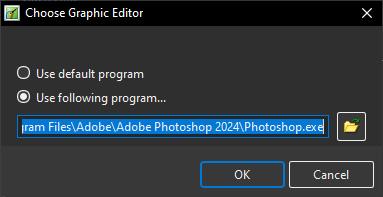
That is correct - you will only see what you have set when you clicked on Set Graphical Editor. By the way, unless the version numbers etc are different for Windows and Mac you should be on Photoshop 2024 and Version 25.1. DG
-
I am on a PC so it will be different but you need to go to Settings / Preferences / System / Set Graphical Editor and point to the correct version. The most recent version of PS (Windows) is 25.1. DG
-
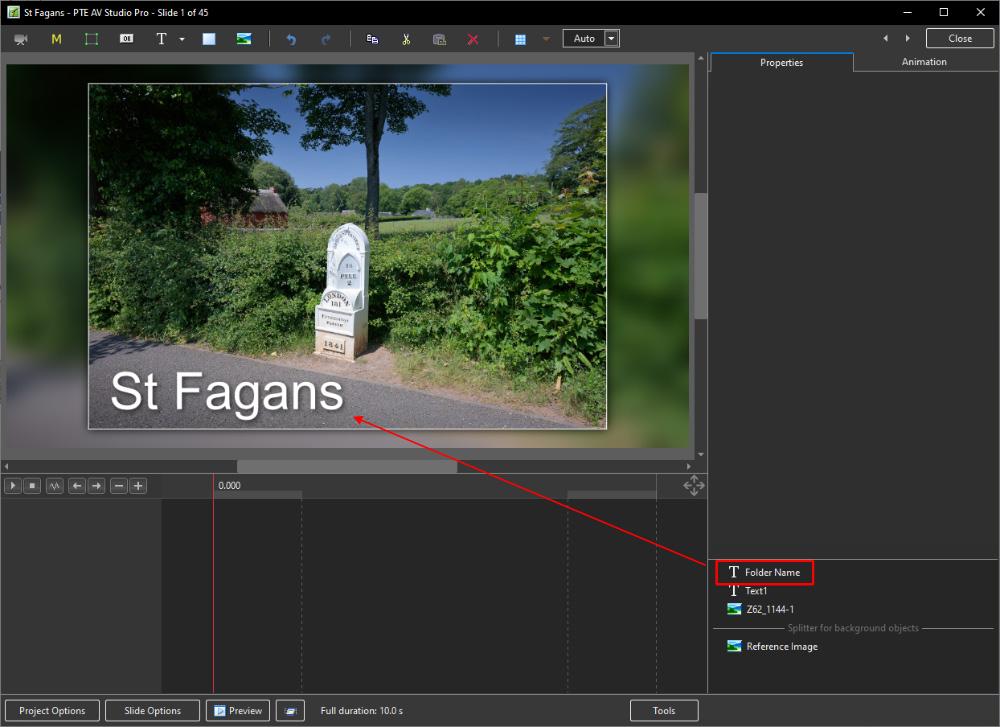
You already can. Recommended methodology in PTE is to accumulate all assets for a show in a single folder with the Folder's name being that of the Show. Add a Text Template - "Folder Name" DG This is just an example - placement and size would be your choice. OR
-
https://docs.pteavstudio.com/en-us/11.0/project_settings_1/preferences?s[]=edit Set Graphical Editor. DG
-
Change File Name for Export slides to images [SOLVED]
davegee replied to mhwarner's topic in Troubleshooting
I think that you have diagnosed the problem correctly. The Export Slides.... Window is not re-sizeable so this is one for Igor. You could try resetting the % of Text Size value (temporarily) in order to Export your slides but I have never done this and do not know how much of a nuisance this would be or how often you would want to do this. DG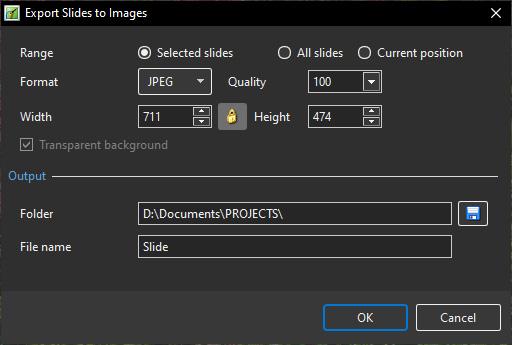
-
Can you make an ISO file? Untick everything else. DG
-
You can recover/check your license key here: https://www.wnsoft.com/en/pte-av-studio/lost-license-key/ If you are copying and pasting ensure that there are no spaces at the beginning and end of the copied key. You can download the version for which your key is appropriate here: https://www.wnsoft.com/en/pte-av-studio/old-versions/ As Jill said, which version did you have on your old PC and which version are you trying to install now? DG
-
Having separated the Audio from the Video and saved it as a WAV or MP3 you can open it in Audacity and add a "Time Track" which will allow you to reduce or increase the the "Speed" of the audio track by up to 10% (90% or 110%). Using the "Adjust Time Range" option (and SPEED control) in O&A/Properties of the Video" you can slow down the Video to 10% or speed it up to 200% with the consequent change in Duration of the video. Matching the SPEED and Duration of the Audio and Video could present a problem if you want to alter the Video Speed by more than 10%. It might be possible to save the Time Adjusted Audio file and re-introduce it into Audacity for another Time Adjustment but I can imagine that the quality would take a hit. It is essential to synchronise the sound and video to take account of what is happening in the Video e.g. stopping at and accelerating away from Lights etc. DG
-
Scroll down
-
Here is an example:
-
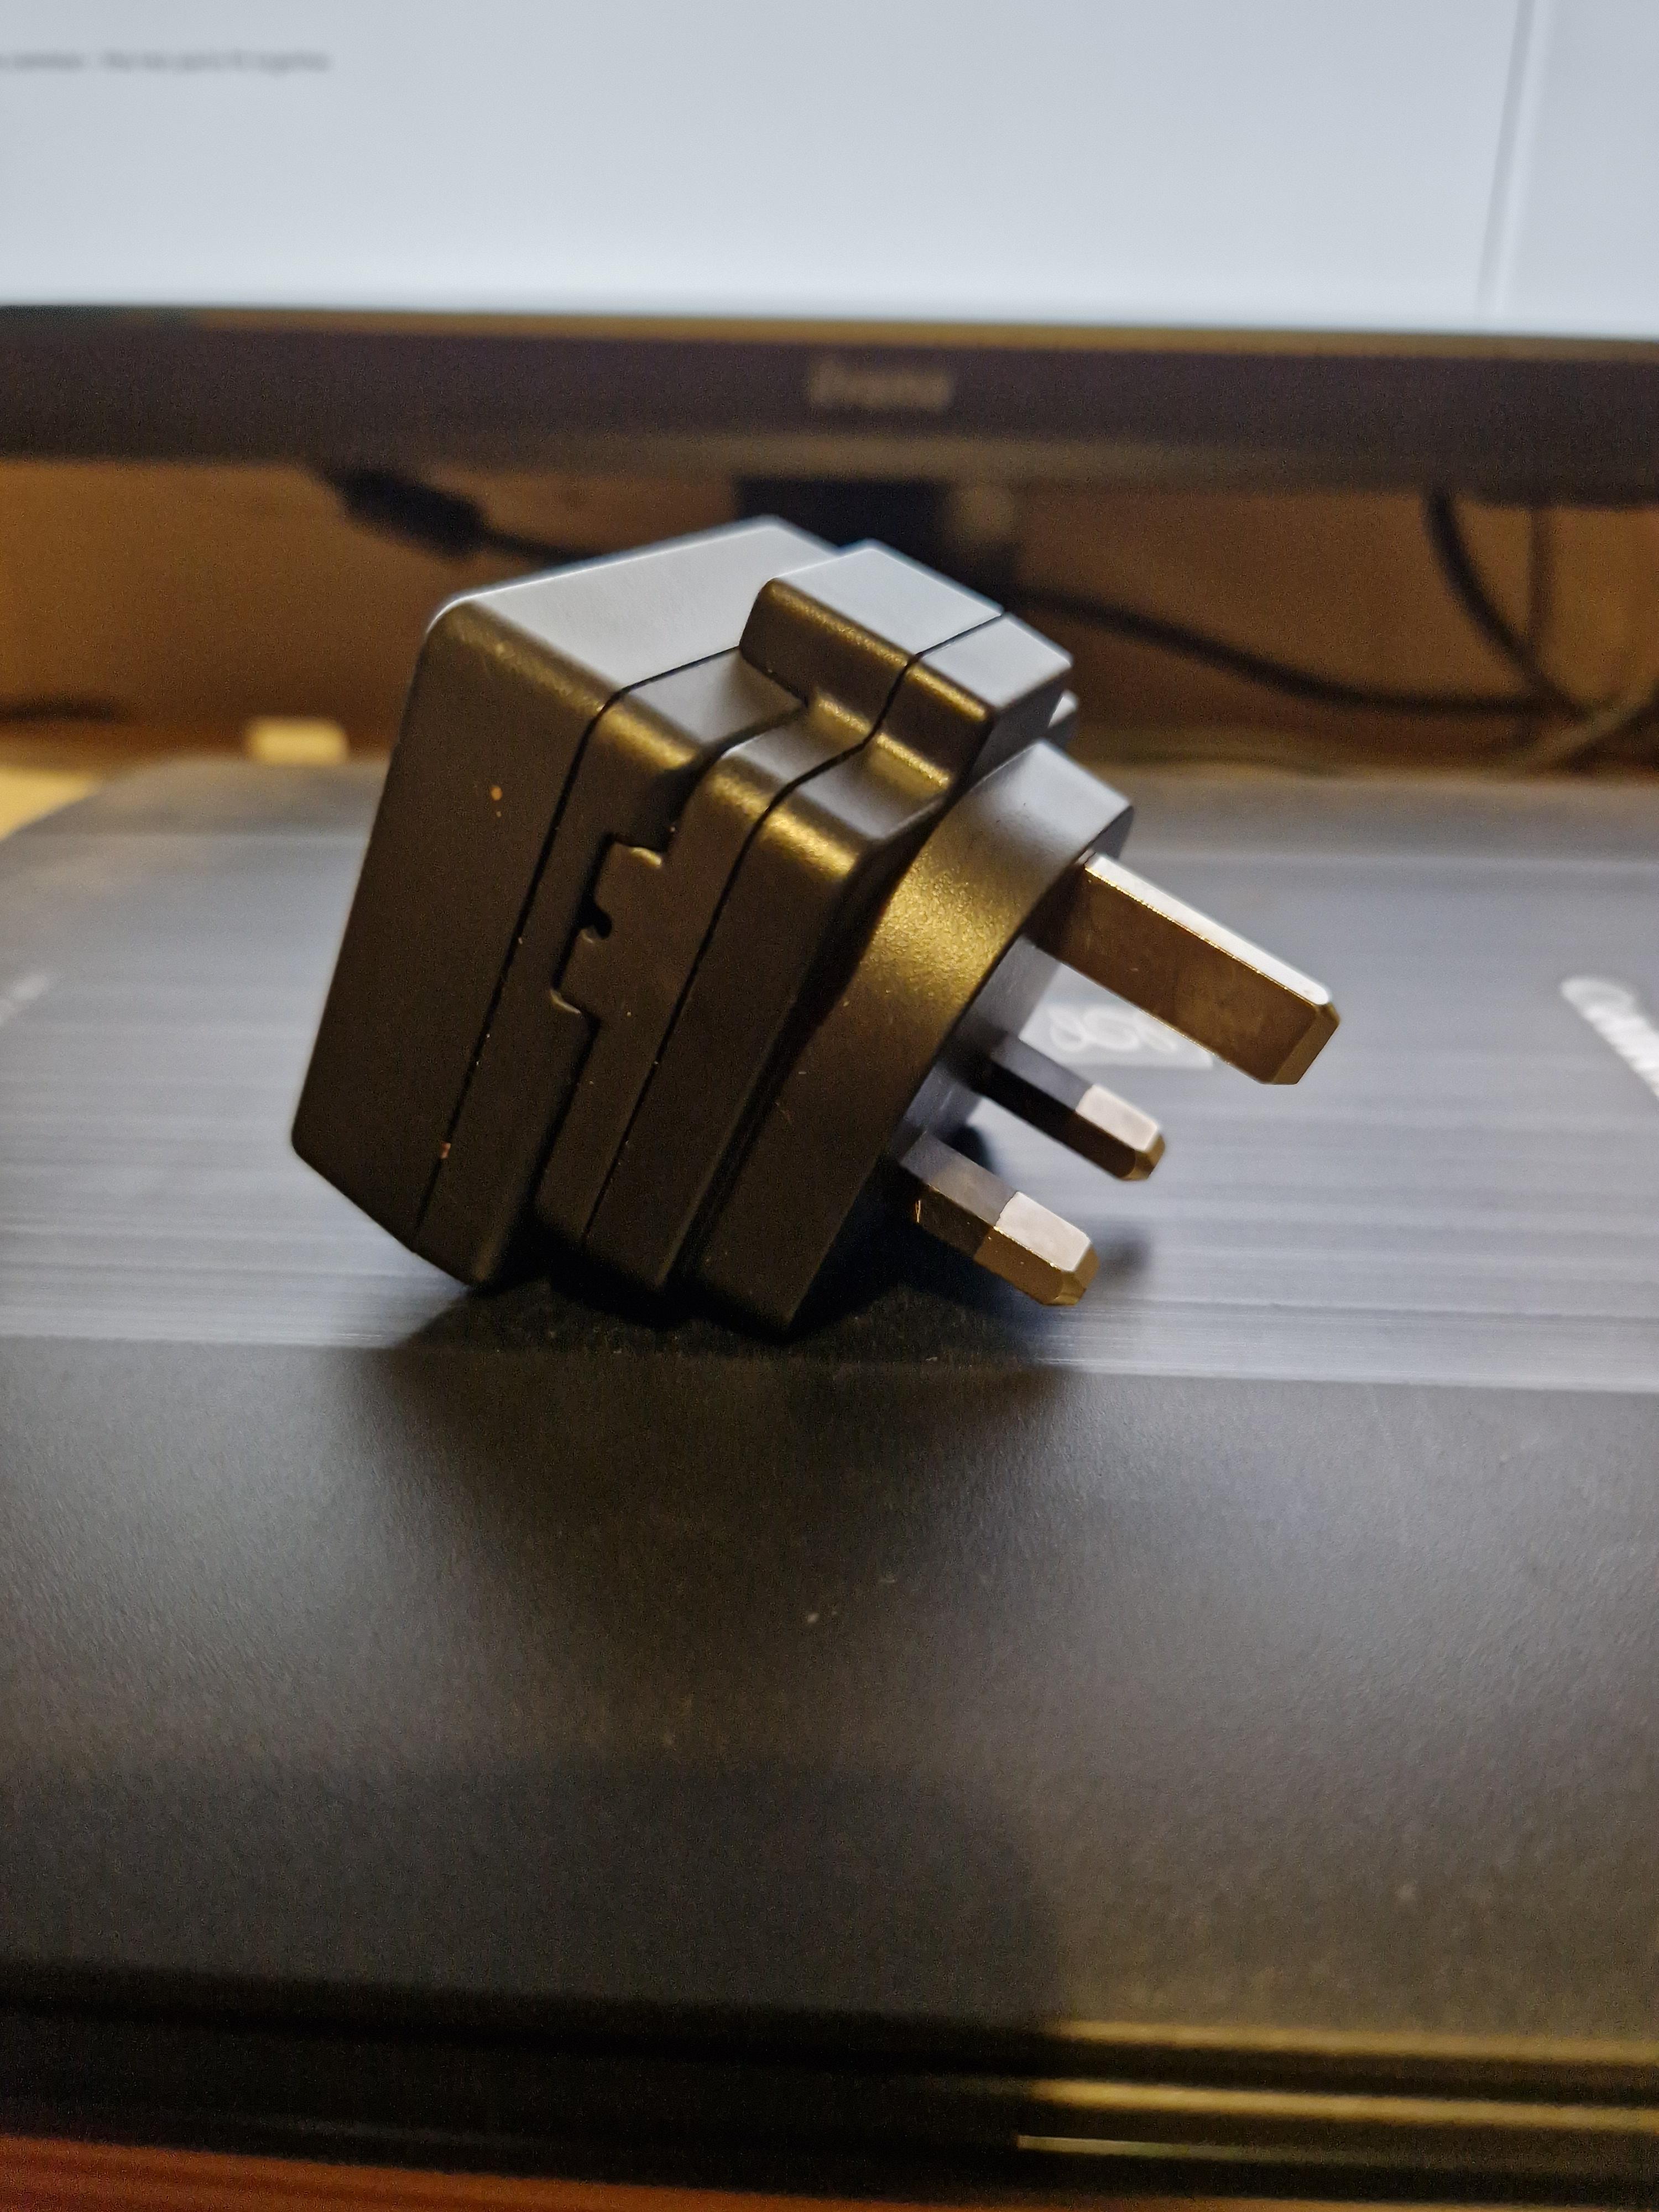
In your photo 3 is a combination of the charger with the wrong plug. If you can part the two components as shown in the video I supplied the you will be able to pair the charger with the correct plug. However, if you are intending to return it then do not even try because you are likely to "damage" (scuff/mark) it in parting the two components. DG
-
Watch this - second part. It is not the UK plug, but you should get the idea.
-
Eric, That is quite common - the two parts fit together - see the image below (it is not the identical one to yours but similar). Once it is assembled it is not easy to part again. Show an image of the two parts i.e. the AC adaptor and the part that you have already shown.