

davegee
-
Posts
9,295 -
Joined
-
Days Won
56
Everything posted by davegee
-
Hi Andrew, Just search for Default Font: http://docs.picturestoexe.com/en/techniques/defaultfont?s[]=default&s[]=font http://docs.picturestoexe.com/en/objects-and-animation/properties_tab#for_text_objects DG
-

Is it possible to pre apply transitions to a folder of images?
davegee replied to The Peeg's topic in Slideshows & AV Shows
Paul, How would that work? Do you mean write the information into the JPEG or some kind of "sidecar" file? DG -
Is it possible to pre apply transitions to a folder of images?
davegee replied to The Peeg's topic in Slideshows & AV Shows
Here's a Style which might be of use. Add all of the NAME slides that you require to use to the Slide List (drag them in). Import this Style (in Slide Styles) - it will appear in your USER STYLES (it might create a duplicate of USER STYLES). peeg.ptestyle Highlight all of the NAME Slides and APPLY the Style in Slide Styles. It will create the three slide sequence in your example From each NAME slide it will create the three slides you show in your example (Blank - NAME - Blank). I have used slightly different timings to you. When you have done this, go to Project Options and set the Default Slide Duration to the value that you want for the images. Drop the images into the Slide List between the pairs of Blank Slides. Transitions might be a problem.They would need to be set individually for the IMAGES in SLIDE OPTIONS. You could Ctrl+Click on all of the Images and set the Transitions all in one go or do them individually - personally I would stick with Dissolve for this application - it would give a smoother presentation. -
Is it possible to pre apply transitions to a folder of images?
davegee replied to The Peeg's topic in Slideshows & AV Shows
I understand. You could set up a Template containing all of the NAME slides and any blank slides that you want and save it. You could then open it and drop their images in at the appropriate points. Save as a different name. That would save some work. You can pre-determine the Slide durations and Transitions in Project Options easily. -
Is it possible to pre apply transitions to a folder of images?
davegee replied to The Peeg's topic in Slideshows & AV Shows
Sounds like a job for Styles. Set one Slide/Image up in the Slide List the way you want it with timing and transition and create a Style from it. Drag all of the required images into the Slide List, select all of them and Apply your Style. The result will be that all slides will have the same time (duration) and transition. Create different Styles for different durations/transitions. See STYLES in the Online Help for more information. P.S. not sure what you mean about the names - could you explain a little more? You can add the image title as a comment within the Style (Project Options - Text Comment for new slides - Insert Template - Picture Name) -
-
-
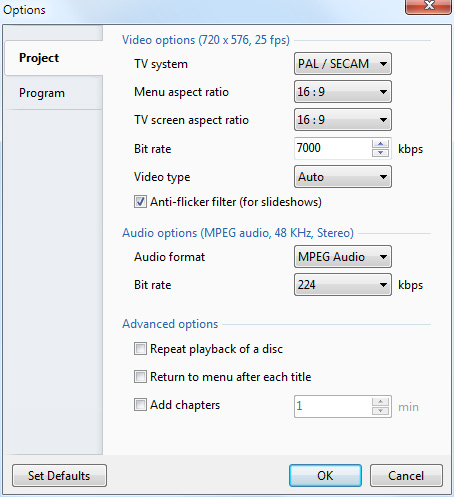
Arising out of a recent thread: I tested the procedures for making a DVD for HD TV which were specific to my home setup*. I believe that the settings and the results could differ depending on the variety of makes and models of DVD Players and TVs available. * My Home Setup: Sony BDP-S490 DVD Player connected via HDMI to my Sony HDTV. The DVD Player features 1080p Upscaling and also has USB Inputs for playing MPEG4 files. My tests were carried out on three Aspect Ratios (AR): 4:3, 3:2 and 16:9. In each case the height of the project was 1080. A single slide of the appropriate AR was added to each of the projects. A white "stroke" line was added to each image using the "Canvas" and "Border" controls in "Adjust Image and Border" to maintain the correct AR. Two versions of each Project were created using either "Fixed size of slide" unticked or ticked. Video Builder Options Note that the TV Screen AR defaults to 4:3 - I changed this to 16:9. I chose my Menu Options and allowed VideoBuilder to burn the DVD (my normal procedure is to "Create ISO image" and burn the ISO using third party software). I used my usual Sony DVD-R. "Fixed Size of Slide" - Ticked vs unticked. 4:3 Unticked: The show filled the height of the TV screen with a percentage of the top and bottom missing due to "TV Safe Zone" 4:3 Ticked: The whole of the 4:3 show including the white stroke line was in view. However the top and bottom stroke lines did not "fit" the visible area of the screen 3:2 Unticked: The show filled the height of the TV screen with a percentage of the top and bottom missing due to "TV Safe Zone" 3:2 Ticked: The whole of the 3:2 show including the white stroke line was in view. However the top and bottom stroke lines did not "fit" the visible area of the screen 16:9 Unticked: The show filled the height and width of the TV screen with a percentage all around missing due to "TV Safe Zone" 16:9 Ticked: The whole of the 16:9 show including the white stroke line was in view. However the top and bottom stroke lines did not "fit" the visible area of the screen. Adjusting for "TV Safe Zone" To adjust for TV Safe Zone I used a "Project Options / % of slide to show main images" value of 96% and this proved to be the exact figure for my setup. The white line around the images sat nicely at the extreme edge of the screen on all edges for the 16:9 and at the top and bottom for both the 4:3 and 3:2 shows. Conclusion For my setup none of the "Fixed size of slide" Ticked versions were acceptable. The 4:3 version came the closest to being acceptable but there was still a gap between the images and the top and bottom of the screen. The gap grew larger with the 3:2 and 16:9 versions. For my setup the "Fixed size of slide" Unticked with compensation for the "TV Safe Zone" set at 96% gave the optimum result in all three AR. * My Home Setup: Sony BDP-S490 DVD Player connected via HDMI to my Sony HDTV. The DVD Player features 1080p Upscaling and also has USB Inputs for playing MPEG4 files.
-
What is your project resolution/aspect ratio? For a 4:3 show try ticking the "Fixed size of slide" box. Another way forward is to make your project 16x9 and overlay your images on that. For instance your images might be 3x2 (1620x1080) overlaid on a 16x9 (1920x1080) project. Then the 16x9 show will "fit to screen". However, you will have to make some adjustment for the "TV Safe Zone" which will be around 90-96%.
-
I like the clean look of the new site - it is easy to read. Lin's suggestion makes sense. I wonder if the exe section could/should be above the video section?
-
I noticed that the new website is up and running. Click on the link above. DG
-
Hi SM, No problem - and thanks for clarifying. I have urged Igor to make regular announcements but I think that the task that he has set himself was more than he expected and hence it is taking a little longer. We are all eager to see version 9 appear in Beta form but I'm afraid the best answer that we have is what Igor gave us recently. Please don't expect that the "finished" version 9 is going to appear soon - Beta testing might take some time - weeks/months. DG
-
Masrawy, Just for clarity, could you explain what you mean, or retract? DG
-
I do not remember it ever being "On Sale" since round 2004 (ish).
-
"Is there some way to automate this process for adding say 40 slide images in one go?" Update. In the current version of PicturesToExe the STYLES feature (in the Deluxe Version) allows you to apply your "Template" (Style) to multiple images as requested above.
-
Compare Editions: http://www.wnsoft.com/picturestoexe/compare/
-
What can we expect in version 9 ?
davegee replied to thedom's topic in Suggestions for Next Versions
Nope - it is not that. -
What can we expect in version 9 ?
davegee replied to thedom's topic in Suggestions for Next Versions
Ken, Something weird going on - I can see your post as intended but others can't - "No Permission Error"?? -
Thanks Stu, I have edited my post. DG
-
Update: The feature requested above is available in the Current Version of PicturesToExe i.e. to be able to see all Tracks in the Timeline simultaneously, within the limitations of screen size. The "envelope" feature is also available making Audio Editing much easier than with previous versions. http://docs.picturestoexe.com/en/main-window/the_timeline DG
-
Update: In the Current version of PicturesToExe the repetitive work required to achieve the effect required here can be easily achieved by use of Styles. Set up the first slide to your requirements and (using the Deluxe Version) you can create a Style from it and apply to all other slides/images as required. DG
-
Update: In the current version of PicturesToExe (v 8.0.17) the procedure described above could be easily achieved with a Style. If the pre-set Zoom In/Out Styles do not do what you want you can create your own Custom Styles and apply to your images (in bulk). DG
-
PTE not running well in Windows 10 VMware
davegee replied to Ronniebootwest's topic in Troubleshooting
Great. Until the MAC version comes along would it be useful for users of MAC/Vmware/Parallels to have their own section to be able to share experiences etc? -
Edited and Updated the Objects and Animations/Main Screen page.
-
Daniel, I have followed your instructions to the letter - same file names - but I cannot duplicate the problem. The file name myslideshowB is suggested for both the MAC EXE and the Safe EXE. I am probably doing something wrong? DG P.S. I tried it on my Windows 10 laptop.
-
What can we expect in version 9 ?
davegee replied to thedom's topic in Suggestions for Next Versions
Perhaps it is a time for patience? Producing a new O&A engine AND making the whole package compatible with MACs for a future stand-alone Mac version was always going to be difficult and take a little time. Don't pull the trigger yet. "You know it makes sense"