davegee
-
Posts
9,295 -
Joined
-
Days Won
56
Everything posted by davegee
-
I could not see any mention of Layers? DG
-
OK, I'll try again. My main requirement of ANY photo editing package is 16 Bit Layers. I start off with a RAW file and do all of my editing, blending (multiple images) etc in 16 Bit. I convert to 8 Bit JPEG at the last possible moment whether it is for PTE or any other use. Since I already have software which gives me this requirement and does everything that Photoscape will do, albeit that the workflow might be different, I see no point in adding software which will not fullfill the quality requirement of 16 Bit Layers. I don't want to post process in 8 Bit. DG
-
"I've been able to figure of most everything but I'm stumped on adjusting the photo to fit into the area that's allowed in the cube." Quite right Denis, but the only way to get the EXACT crop that you require WITHOUT having to edit the resulting Cube is to supply the Style with pre-prepared SQUARES. We have assumed that the OP is using the Experimental/Cube Style. I am a little disappointed that he has not returned to clarify his problem(s). DG
-
Hi Lin, I followed the link and read the blurb. While it would be OK for some my number one requirement of any photo software would be 16 Bit Layers. So, in my case, already having that, I don't feel the need to download. But it is an option for the jpeg shooter, perhaps. DG
-
You already covered the other part: "you need to use square images to begin with." If you want to fit an AR other than square then you need to add masks within the style (not difficult) and in the resulting cube you would probably want/need to adjust each image for "best fit". I don't see any advantage in that when there are plenty of ways of creating square images. Pixbuilder will do that if PS is a problem? DG
-
Here is a re-configured version of the "Experimental Cube" Style. The Border Colour and Width are both adjustable after applying the Style. CUBE with Border.ptestyle DG Import a Style: http://docs.picturestoexe.com/en/slide-styles/import_style
-
Wow, the lengths some people will go to........ At this time styles are not "additive" so any given style will overwrite any animation or (PTE) enhancements to an indexed image. Maybe one day? DG
-
If you add the border in PS then obviously it is an integral part of the image. If you make the border in PTE then the style will overwrite it. You can apply the style, add the border and then save as a new style. Then you won't have to do it again.
-
"How are you creating your cube? Are you making it yourself or using a style? If using a PTE Style it would be best to use the PTE feature to add borders to your photos before selecting them for the cube style. It's "possible" to go into objects and animations and create a border on each of the sides of the cube one at a time, but much easier to set that default on before using the style to create the cube" Lin, Applying a style to an indexed image will negate any operations such as border. DG
-
Agreed Igor, But it is a tutorial about principles of timing and Keyframes and smooth transitioning (the zoom effect) across multiple slides and images. If it were done the way you suggest, then why not go the "whole hog" and make the whole 5 to 8 minutes presentation in just one slide?? Using a single B+W image in a show can sometimes be "jarring" so my thoughts were that moving from colour to B+W and back to colour across two images would be less "jarring" while providing some variety. That would take at least two slides? DG
-
Download the Style to your HD and Import it into your User Styles. ZoomBW3.ptestyle Drag two (or 4, 6, 8 etc) colour images into the slide list. Highlight both (all). Apply Style above. You can vary the duration of the overall applied style. DG
-
It is much easier to upload/download a style compared to a Template. The user provides the images/videos/objects and the style does the rest. Explanatory text is also possible. DG
-
Maureen, You get better each time!! DG
-
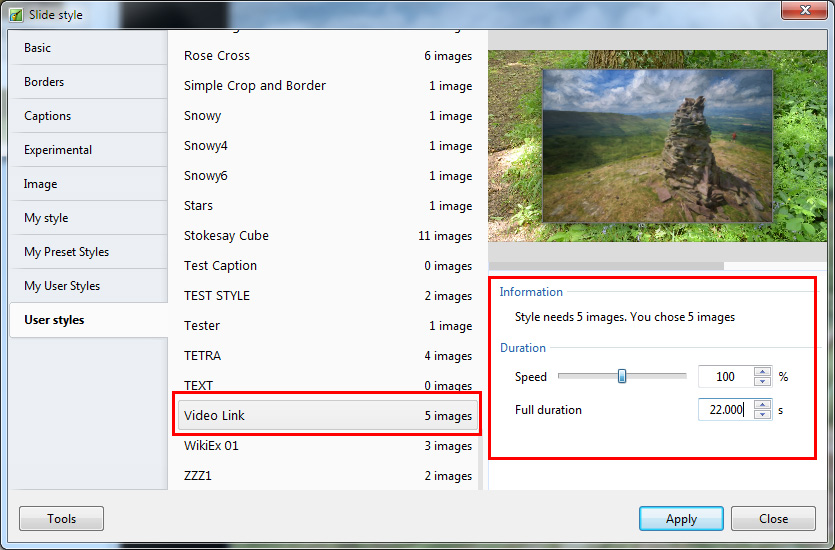
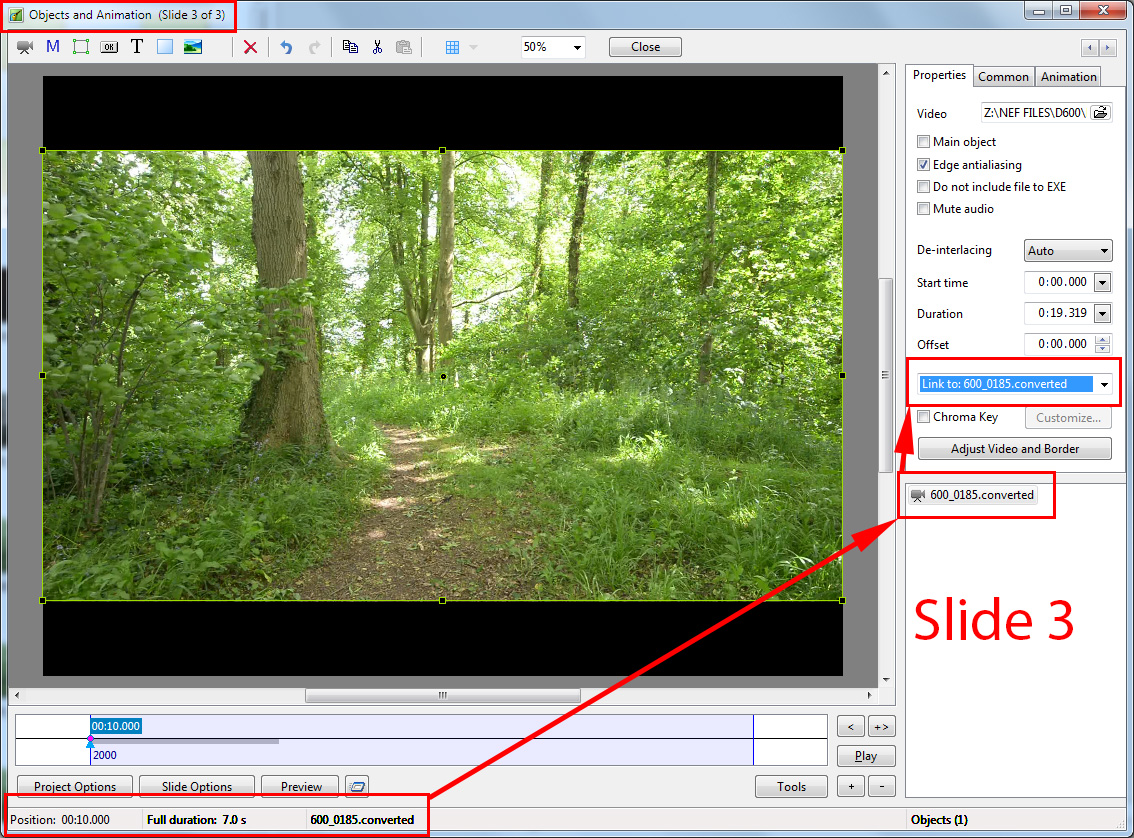
Here's a tutorial dressed up as a style: Video Link.ptestyle In a 16:9 project...... Add (drag) a short video (around 22 - 30 secs) into the Slide List (Slide 1). Add (drag) four Images into the slide list (Slides 2-5). Import the Style above into your User Styles. Highlight all 5 slides - Click on first Shift-Click on Last. The Slide Style window should look like this: Adjust the Full Duration (of the applied style) as required. If the chosen Full Duration is greater than the length of the Video Clip it will stop before the end of the applied style. Apply the Style. The result is Four Slides with an Image being shown over a continuous Video Clip Linked across the four slides. Take each of the FOUR slides in the Applied Style into Objects and Animation and examine the settings for the Video Clip. In particular look at the Properties of the Video Clip in each Slide. Slide 1 = Master Video Track Slide 2-4 = Link to "xxx.converted" In slides 2-4 the video will be a "Reference Image" referenced from Slide 1. Normally, if not produced by a Style, this would read "xxx.converted" Note that the four "Images" added to the Slide List could also be Short Video Clips - the result being a video being played over another (longer, linked) video in each slide.
-
Hi Lin, I added a P.P.S to post 15 about the copy/paste - I have always done it manually. I will make sure that the Help File reflects that behaviour.
-
Ray, The alternative is that Mobilelite needs an update to work with the latest iPad OS? DG
-
A slide containing a video clip is still a slide. Can I suggest that you try to replicate my example with your video clip as a test? Add three blank slides to the slide list 7 - 20 seconds - in O&A add the video to slides 1, 2 and 3 - make the video clip in slide 1 the Master - make the video clips in slides 2 and 3 "Link to [the video in slide 1]" using the dropdown menu. P.S. If you drag a video clip into the Slide List it will create a slide with the Slide Duration = Video Clip Duration. If you add a video clip to a Slide in O&A its duration is governed by the Slide Duration. By adding the video clip to the next Slide and Linking as shown above it will play continuously for the duration of the two slides and so on. To play a 3m 25s video over multiple slides (with sound) in the background you would need to do this for 34 slides at 6s per slide. I would complete the show WITHOUT the background Video Clip (in this instance) and add it at the very end (because the Slide Durations of all slides will be governed by other images and Video Clips). Add it to slide 1 (Master). Copy and paste to slide 2 and set "Link to etc". Copy the video from Slide 2 to all subsequent slides. The "Link to" command should go with it.
-
Ray, I think that the "problem" began when I updated the iPad Software (OS). It seems that I cannot (for whatever reason) hear the sound when playing an MP4 directly from the Mobilelite Software (wirelessly). I have to transfer the MP4 to the iPad and then play it with Good Reader or similar. With my Kindle it plays wirelessly from the Mobilelite unit with sound and no problems. At this stage I can only assume that it is the iPad OS which is causing the problem. However, I haven't spent a lot of time trying to solve it. I was hoping that someone like yourself could test and report back - have you updated to the latest OS on the iPad and can you still play video with sound wirelessly from a USB key?? DG
-
Linking a SINGLE (background) video across MULTIPLE short slides:


-
Lin, I would add the main images/video clips first and allow the video clips to control the slide duration(s). Then, in O&A, the background video can be added to the first slide and copied to subsequent slides using the Master and "link to" properties. I don't remember it ever being any other way? DG P.S. I read your post again and, unless I missed something, you have not mentioned that all instances of the background video (other than the Master) would be set to "link to" the Master. P.P.S I just realised that when you copy and paste a video clip which has been designated as master to another slide the "Link to..." is done automatically. I will try to include that in the Help File.
-
YES.
-
Thanks Stu, I found that to be a very "un-smooth" option with both earlier shows (not the same version) and shows made with the same version. Lots of "flashing" of different varieties depending on whether the show being linked is from an older version or the current version. More control of the result is possible with the O&A / Common Tab options but requires a Mouse Click. DG P.S. "Inserting" shows and "chaining" shows also require different techniques.
-
In the slide that you want to "depart" from insert a link to the EXE and use "Action on Mouse Click" in the Common Tab in O&A. Set it to "Run Slide Show and Return" and then direct the link to the EXE. Ideally, both shows should be made with the same Version of PTE. If not, then try one of the other options. The Link can be Text or any other object such as the Main Image or preferably an invisible rectangle in one corner. Set the slide to "Wait for Key Press" in Slide Options and when you are returned a mouse click or keyboard action will continue the show. DG P.S. You can "chain" EXE's by going to the Project Options / Advanced Tab and use "Run Application or Slideshow on Exit" and point to the EXE that you want to run.
-
No problem, My Templates are all in a single PTE Templates Folder on a drive which is backed up regularly. Instant access to every show you have ever made: DG
-
If the Template version is used and directed to a specified folder on a drive other than C, instant access to that Template at any time in the future is available via the File / Template menu without having to search and Extract. DG